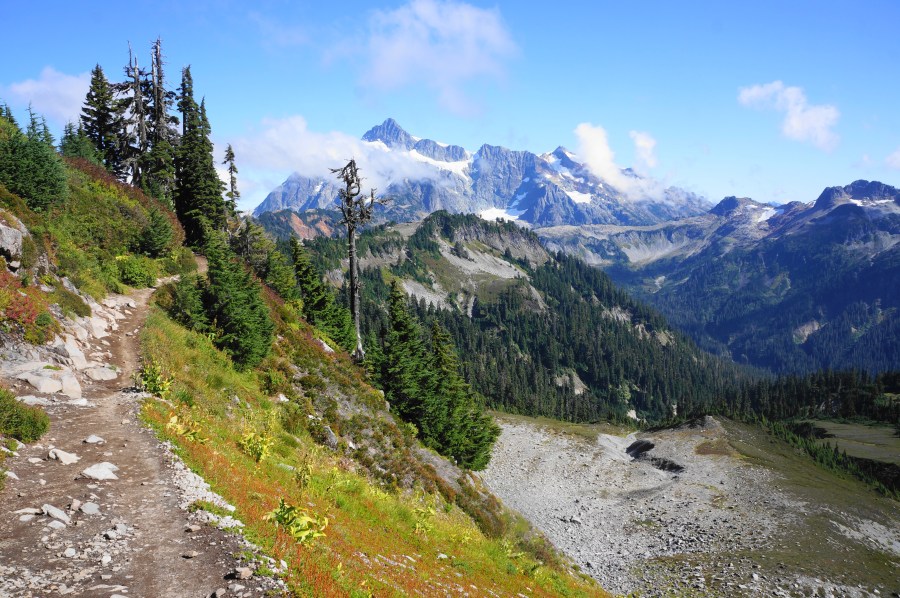
Cataract Falls Trail, Marin Municipal Water District, Mount Tamalpais Watershed, April 2023
Described as “very rugged and demanding,” the stair-master challenge that is the Cataract Trail is nonetheless one of the most popular and rewarding hikes in the Bay Area’s Marin County. The well-trodden path follows the rumbling waters of Cataract Creek, which originates on the slopes of Mount Tamalpais and terminates at Alpine Lake, a man-made reservoir in the Marin Municipal Water District’s Mount Tamalpais Watershed. Along the way—at least in the wet season of winter and spring—travelers are greeted by majestic waterfalls, one after another, and a lush forest of ferns, coast redwoods, tanoak, bay laurel, and Douglas fir. The Cataract Trail (or Cataract Falls Trail) extends nearly three miles from Alpine Lake to the Rock Spring parking area on Bolinas Ridge; however, the bottom half is most interesting, and thus the focus of this hike. The description below covers a trek from Alpine Lake to the meadows at Laurel Dell, with a short loop portion—combining a portion of Laurel Dell Road and the High Marsh Trail—that features ridgetop views across the watershed.
Map of Cataract Falls Trail, Marin Municipal Water District, Mount Tamalpais Watershed; created using alltrails.com
The hike
There are multiple access points for the Cataract Trail, including the Laurel Dell and Rock Spring parking areas in Mount Tamalpais State Park. However, the preferred option for access to the most impressive stretches of Cataract Creek is to park at the Cataract Trailhead (see map), a sort of makeshift but popular access point along the Bolinas-Fairfax Road, just south of Alpine Dam. The parking area is nestled in a lush gully just above the lakeshore, and there are a pair of portable toilets; parking—on the road shoulder—can be tight and fills up quite quickly on weekends, so arriving early in the morning (or perhaps late in the afternoon) is a must.
Note: This hike was facilitated in part by a collaboration with adidas. We used the opportunity to try out our new Terrex Trail Riders and Ultraboost 1.0 running shoes, which were provided as gifts as part of the collaboration.
Sporting our new shoes
A trail post and sign mark the start of the trail, initially wide and mild as it flanks a moss-laden wall on the right and drops to the shores of Alpine Lake on the left. The reservoir was dammed in 1917 to provide drinking water for Marin residents and today doubles as a recreation area. The waters in the southern inlet here tend to be murky but gleam turquoise-green in the partial sun. After 1/10 mile, the Cataract Trail skirts a small cove, traverses a short bridge over a tumbling tributary stream, and ascends a short staircase before levelling again.
Setting off down the trailAlpine Lake viewsSkirting an inlet along Alpine Lake
Enjoy the thicker second-growth redwoods as the trail continues southward along the reservoir, and ascend another staircase with a wooden railing, soon coming to the southern end of Alpine Lake. From here the path follows Cataract Creek, which boasts an initial set of small cascades down to the right that is popular with photographers. Stay on the narrower path as it begins to climb more steadily, coming to the first set of significant cascades on the left at about 3/10 mile. Here a tributary also converges with the main drainage and is crossed partway up a steep, stone staircase.
Redwoods along the trailEntering Cataract Creek drainageSkirting the first significant cascadesTumbling cascades
The stone and wooden steps continue thereafter, and the trail rises to a taller, 20-foot cascade that is partly obscured by the overhanging bay laurel. A wooden fence prevents hikers from approaching the creek’s banks, which are notoriously slippery.
View of obscured waterfall
Another winding stair leads to a fenced viewpoint of what is listed on some maps as the proper Cataract Falls. Here the creek tumbles down a narrow chute into a wider, fern-laden passage. The views of the highest drop are distant but unobscured, making this drop arguably the most impressive on the whole hike. Take a breather here before heading on.
Cataract Falls
The stair-master continues as the path switchbacks briefly away from the creek, then rising back to a spot parallel to the falls. At about 6/10 mile, the Cataract Trail traverses a long, wooden bridge over the creek, with more cascades visible upstream to the right. Round a left-hand bend and rise steeply up the east bank, cresting an outcrop with onward views down to a small but lovely falls and glossy pool. This spot is sometimes known as Helen Markt Falls and makes for a nice snack spot and, if warm enough, a swimming hole.
Helen Markt FallsClose-up of the small falls
Steps beyond the view of these falls, the hike comes to its first junction. Bearing left takes one on the Helen Markt Trail, which is sometimes combined with other tracks to form a much longer loop. The Cataract Trail, however, continues right, quickly finding the creek again.
Small cataracts above the trail junction
After a brief uphill, the incline soon mellows out, reflecting also the mood of the stream, which here is much slower-flowing and rippling in small pools. This much-appreciated level section lulls hikers into thinking the waterfalls—and climbing—might be over, but soon enough, the slope resumes and scenery returns to match that of the initial 6/10-mile section.
Mellow level sectionClimbing again
Ascend a set of wooden stairs at about 8/10 mile, then drop to a spur trail, which is worth taking and leads one to a significant waterfall, listed as Midway Falls. This drop, at around 25 feet, is the highest encountered yet.
Midway Falls
When ready, return to the main track, which soon passes other cascades and enticing pools—but most are blocked off for restoration and safety purposes. At around 1.1 miles, hikers will reach another particularly pretty area with multitudinous cascades, followed by a set of switchbacks that culminates at a bench on the left. From here it is a short walk to a junction, where a set of steps leads down to another pleasant pool fed by small cataracts.
Another nice snack spotObscured views to Laurel Dell Falls
Back on the main trail again, continue upstream and come soon to an obscured overlook of Laurel Dell Falls, a tall chute that is nonetheless largely inaccessible. A wooden fence and restoration signs prevent visitors from reaching the base of the falls.
Soon the trail turns away from the falls and rounds up a slope to a signed junction at 1.2 miles. Hikers can turn around here and return to the start. But curious wanderers will likely want to push a little further, and thus take on the proposed loop portion that begins at this fork.
Start by heading right, coming after about 250 yards to a suddenly open area known as Laurel Dell, where there are picnic tables in the shade of the redwoods and several open meadows. This pretty spot is a way station on several hikes in the area, and there are a pair of pit toilets that hikes can use.
Laurel Dell
Stop for a picnic here, or continue the loop section but heading left on the gravel Laurel Dell Road. This mellow track heads north through fir and tan oak forest for 2/10 mile to a junction with the 75 Yard Trail. Take a left on this path and walk for—wait for it—75 yards until it merges with the High Marsh Trail, where one should head left again, in the direction of Cataract Creek.
The views are initially limited as the High Marsh Trail follows the north-facing slopes of the high ridge. However, they suddenly explode with splendor as one enters an open meadow at the junction with the Bare Knoll Trail at about 1.9 miles. One can see across the watershed for miles, with a tiny portion of Alpine Lake visible, and beyond to Azalea Hill, Pine Mountain, and the northern reaches of the Water District lands.
Open vistas across the watershedOnward trailViews at the trail junctionDescending the High Marsh Trail
The High Marsh Trail continues straight at the junction and stays in the sun for another ¼ mile, descending mildly but steadily back toward the Cataract Creek drainage. After returning to the woods, it is a quick jaunt back to the start of the loop, where the High Marsh and Cataract Trails converge.
This time head right, embarking on familiar terrain down to Laurel Dell Falls. The rest of the hike retraces the 1.2 miles already completed on the Cataract Trail, but new angles offer perhaps different views not noticed on the way up. The out-and-back culminates back at the trailhead along Bolinas-Fairfax Road, where your car awaits.
Seven Wonders Loop, Valley of Fire State Park, February 2023
In a hike combining Valley of Fire State Park’s most Instagram-famous spot with the wilder and more adventurous Seven Wonders route, this scenic loop traverses some of the park’s most spectacular scenery, from narrow slot canyons to vibrantly-hued sandstone knobs. The wonderful diversity makes this perhaps one of the best two-mile treks in the state of Nevada and is relatively easily accessible to all—as long as one can follow the sporadically-placed yellow blazes, essential for navigation in this trail-less terrain. (Note: Admittedly, however, the “seven wonders” are still hard to spot; yours truly identified only four of the seven; see here and here for details of more successful runs. The hike is also sometimes combined with the one-mile White Domes Trail to form a roughly three-mile trek.)
Map of Fire Wave Trail – Seven Wonders Loop, Valley of Fire State Park; created using alltrails.com
The hike
The walk amid the “wonders” begins at the Fire Wave Trailhead (Scenic Vista #3), with parking lots on both sides of the White Domes Scenic Byway, about 4.7 miles north of the Valley of Fire State Park Visitor Center and just under 60 miles from Las Vegas, Nevada. Park on the east side for easiest access to complete the loop in the clockwise direction.
The jaunt begins with the very popular Fire Wave Trail, which culminates at the first of the “Seven Wonders.” (Note: The Fire Wave Trail is on the Valley of Fire maps found at the Visitor Center, but the Seven Wonders Loop—although now an “official” trail—is not.) Set on a sandy, scrubby basin surrounded by deep ruby outcrops of Aztec sandstone, the Fire Wave Trail sets out eastward toward the “Rock of Gibraltar” (no, not that one). The iron-oxidized behemoth towers above as the trail drops partway into a minor drainage and bears south.
Rock of Gibraltar from the Fire Wave Trail
The Fire Wave route makes for a clay saddle with several mammoth-sized boulders that at one point were sheared off from the Rock of Gibraltar above. Rise to a crest at 2/10 mile, then descend a new arroyo that passes through another crop of sandstone chunks. Beyond, hikers can catch a glimpse of a pinkish-orange ridgetop; the Fire Wave feature lies just beyond. Descend to the drainage again, then follow the yellow blazes out across the slickrock, enjoying the striated patterns and colorful swirls at your feet.
Peering south toward the Fire Wave areaLooking back at Rock of GibraltarFire Wave TrailApproaching Fire Wave
The route ascends a slight incline as it approaches the first “wonder,” with many stopping to take in the view at a high point overlooking the Valley of Fire. Find your way down to the protruding pink-and-cream colored knob below—the Fire Wave. The best angles are from the immediate north and south sides of the grooved “wave,” with the colors most vibrant in the bowl-shaped washes adjacent to the famous knob. Expect lots of people here, however, to prevent you from getting a clean shot!
Looking down toward Fire Wave knobThe knob at Fire WaveThe masses at Fire WaveAnother look at Fire Wave
This marks the end of the Fire Wave Trail, with most turning around at this point. But the Seven Wonders Loop picks up where the initial trail leaves off. The more rugged route drops down into a side drainage on the south side, where a sign greets you reading “END OF FIRE WAVE TRAIL; 7 WONDERS LOOP CONTINUES.”
Start of Seven Wonders LoopKaolin Wash
Drop into gravelly Kaolin Wash, a scenic drainage that cuts west-east across the park, and bear right, following the wash upstream. Immediately one begins to notice the multiple colors of the surrounding sandstone—including varieties of pink, orange, and gold—a prelude to the aptly-named Pastel Canyon (a.k.a. Pink Canyon), the second “wonder” on the tour. Here Kaolin Wash narrows to nearly a slot. (Note: After recent rains, it may be filled with water; in this case, bypass by ascending and descending the slickrock on the left, careful to avoid cryptobiotic soil.)
Pastel Canyon via bypassDown in Pastel CanyonPastel Canyon slotWater-clogged Pastel Canyon
The beautiful narrows continue for perhaps 100-150 yards before emptying out at a spot where the trail crosses the White Domes Scenic Byway. (Note: There is no parking allowed here.) Carefully cross the road and continue up Kaolin Wash on the other side.
Kaolin Wash on the west side of the road
The creamsicle colors are particularly vibrant thereafter, and at some point around here (I missed it), the trail passes the third wonder: Striped Rock. With tall golden outcrops up ahead, the hike reaches another short slot section at about 1.3 miles. (Note: This too is sometimes filled with water, requiring a slightly tedious but passable bypass, again on the left.) This part of Kaolin Wash (as well as the larger slot, off trail on the neighboring White Domes route) is sometimes considered to be the fourth “wonder.”
Kaolin Wash narrowsKaolin Wash beyond the narrows
Pass through (or around if necessary) the narrows, then stay in the drainage as it opens up again, but soon look for a yellow stake signaling that hikers should exit on the right, following a tributary wash. Follow the drainage for about 1/10 mile, then cut right across open slabs, with a wonderful viewpoint up to the right. From here one can peer back across Kaolin Wash to the towering sandstone domes of the heart of the park.
Terrific vista from just off the Seven Wonders Loop
Then drop to another sandy wash and cross another before arriving atop a fin with a view back at Crazy Hill, the fifth wonder. Here the sandstone appears as if an artist spilled a rainbow of paint, with cream, orange, gold, and purple colors all in a line.
Crazy Hill colorsCrazy Hill from another angleLeaving Crazy Hill
By now the hike is almost done, and the exact locations of the final two “wonders” (Thunderstorm Arch and Fire Cave) are still a mystery to me. But the remaining stretch is scintillating as usual, with the cream-colored sandstone soon returning to deep red. Skirt the right flank of a fin, then follow the ruddy soil up a final drainage. With the wash thinning, the route at last spits out back at the main road, this time in the parking lot across from the Fire Wave Trailhead. Cross the street to finish the two-mile loop.
White Domes Trail, Valley of Fire State Park, February 2023
There is perhaps no other place in the American Southwest where the sandstone erupts in such a range of color—from pastel pink to orange, cream, gold, and deep red—as Valley of Fire State Park in southeast Nevada. As one enters the Las Vegas-area park, the scenic White Domes Scenic Byway first cuts through the vermilion cliffs of Aztec sandstone but then, after a crest, explodes into an assortment of vibrant hues. Within the jumble of protruding outcrops lies a maze of interlocking canyons, hidden arches, and other treasures—a portion of this Martian landscape can be explored on the popular, one-mile White Domes Trail, situated at the end of the scenic drive. Specific attractions include a short but brilliant slot canyon and the remains of an old 1960s movie set.
Map of White Domes Trail, Valley of Fire State Park
The hike
The White Domes Trail is named for the tall, cream-colored sandstone humps that rise from the basin at the end of the Valley of Fire’s White Domes Scenic Byway. Parking in the small lot here is scarce, but there is often some available along the road shoulder. Head south for the sign marking the start of the one-mile loop, and begin to make your way up a sandy slope between two stony fins.
Dramatic look from the White Domes Trail
After rising to a gap, a pronounced declivity offers views southward to a candyland of pink, golden, and creamsicle hues, with striations and cross-bedding offering texture to the rounded knobs. The White Domes Trail begins a sharp, steep, and stony descent that requires careful footing even as the park has developed usable steps for much of the decline. After navigating the thin passage, the path finds sand again and levels off, with the terrain opening up into a wider sink.
Descending toward Kaolin WashStony descentNear the bottomWavy sandstone
There are stone ruins off to the left—but these are no ancient dwellings of a native tribe nor even a homestead cabin used by an adventurous squatter. Rather, they are remains of a movie set for a 1965 film titled “The Professionals,” a relatively popular Western starring Burt Lancaster, Lee Marvin, Robert Ryan, and Woody Strode. Valley of Fire has occasionally been used as a backdrop for other films, including “Star Trek Generations”—as the wayside at the site explains.
Movie set ruinsLooking back
It is a short walk from the movie set down to Kaolin Wash, a usually dry drainage that cuts east-west through the sandstone wonderland. Orange, pink, even purple hues are on display as hikers bear right in the wash, soon entering a narrow slot canyon—and an easy (obstacle-free) one at that. Here the walls rise high but thin to as low as four feet apart, and the gleaming entering the slot produces fantastical colors and photogenic bends.
Entering the narrowsThrough the slotSlot at Kaolin WashKaolin Slot
The slot is short but beautiful, culminating at an opening where the trail exits the wash and rises up to a higher shelf below the White Domes. Take the marked, sandy path as it follows a minor arroyo; bear left at a split at around ½ mile, following an onward channel via a northerly tread.
Rising up out of Kaolin WashMulticolor landscapePastel colors
Soon the trail rises above the wash and continues between clutches of sandstone, with the soil turning a ruby color. At 7/10 mile, crest a saddle where one can see a small archway off to the right and views north to the vermilion outcrops, with the Mormon Mountains rising in the distance. Off to the left, one can also spot a high arch in the Aztec sandstone outcrops.
Peering back at the White DomesSmall arch on rightDistant arch to left
Soon the rather level track enters a new wash, and the onward route cuts through a narrow notch in the red sandstone, where the extensive tafoni resembles a beehive. After squeezing through the gap, the immediately bends south and parallels the road for a brief period, ending back at the parking lot where hikers started one mile earlier.
Beehive-like formationsDistant Aztec sandstone finsThe final notch
The White Domes Trail is a short, relatively easy walk (with one steep descent) that should take visitors around 30-45 minutes.
Anniversary Narrows, Muddy Mountains Wilderness, February 2023
Anniversary Narrows is Nevada’s best answer to the challenge laid down by neighboring Utah: give us your best, most picturesque slot canyon. Better yet, extend the slot for more than 1/3 mile, place the trailhead less than an hour’s drive from the state’s largest metropolis (Las Vegas), and offer options for different approach routes for some variety. Up to the challenge? Sure enough, the beautifully-twisting Anniversary Narrows—highly textured and gleaming with color—more than fits the bill. The slot is an approximately 2.5-mile walk from Lakeshore Road in the northern half of Lake Mead National Recreation Area, park typically better-known for its boating than hiking. The hike passes out of the park, skirting an active mine, and enters Muddy Mountain Wilderness, itself a scenic but relatively sparsely-visited, 48,000-acre tract of wildlands. The approach features colorful cliffs and open vistas, but it is all about the destination on this hike: a rewarding, 1/3-mile narrows that thins to as small as 4-5 feet. (Note: This hike is sometimes called Lovell Wash, named for the drainage in which the narrows sit.)
Map of Anniversary Narrows, Lake Mead National Recreation Area and Muddy Wilderness Recreation Area; created using alltrails.com
The hike
The area north of Lake Mead is perhaps known best for two things: its vibrant, colorful valleys and canyons…and borax mining. The latter has seemingly posed an access problem in the past, as the route to Anniversary Narrows cuts through a thin section of private property. As of early 2023, however, this did not appear to be an issue, with no visible signage or fencing hindering movement from the trailhead to the narrows.
Although the narrows are outside the park, the Anniversary Narrows Trailhead is situated well within the boundaries of Lake Mead National Recreation Area. The main trailhead is less than an hour’s drive from Las Vegas and is situated just off Northshore Road (Route 167), about 12.7 miles east of the junction with E. Lake Mead Road (location here). Look for a brown sign marked “Calville Wash North,” on the north side of the road, just as the highway crosses over the namesake drainage. Follow the wide track as it turns to dirt, and park in the small lot just above the banks of the (usually) dry wash.
Now, for the adventurous off-road type, there is an option to cut off much of the hike by continuing on the 4×4 track down into the wash and up and out the other side. In fact, one could, in theory, follow the rugged Anniversary Mine Road for nearly two miles, right to the descent into Lovell Wash. But this is really only an option for jeep owners; as attractive as shaving off all but two miles of the nearly six-mile hike may sound, you don’t want to be that guy who gets stuck. Tows are expensive, and cell service is fleeting to nonexistent in this part of the desert. Fortunately, there is a deterrent right at the start to help you make the choice: just past the parking lot along Calville Wash, the sandy track drops precipitously at such an incline that it wards away most without four-wheel drive from trying their luck. Most of you will probably feel the same: as a consolation, the approach route isn’t so bad as a walk, and the extended loop offers the option of taking an alternative route (via Lovell Wash) on the way back (considerably more scenic than Anniversary Mine Road anyway).
And so, after parking at the 2WD lot and packing your daypack, prepare yourself for nearly six miles of relatively easy—though almost entirely sun-exposed—hiking. (Note: Like most hikes in the Las Vegas, doing this hike in summer is not at all recommended.) Begin by descending the road down to the wash bottom, at this point quite wide. The narrows are situated in nearby Lovell Wash, not this one, and there is not much to write home about Calville Wash.
Your time in the wash, however, will be short: after treading up the drainage (northeast) for 1/10 mile, head left on the rocky track heading left (northwest). Though unmarked, this is Anniversary Mine Road, the primary access route to the narrows and vicinity.
Minor drainage along the Anniversary Mine Road
Follow the road as it traces a sandy tributary, which courses through shallow hills. Cross the wash at 3/10 mile, then climb up and out into the open, now along a partly-asphalted track with views to the Muddy Mountains. The base layer here is the Lovell Wash Member, mostly a mix of orange- or chalk-colored limestone and sandstone, but there are streaks in the area of other types, including basalt, volcanic tuff, and plutonic rock. The Gale Hills give way to the higher Muddy Mountains, with the highest peaks out of view to the north.
Setting out along the gravel roadLook back toward the Black MountainsLooking ahead to the Muddy Mountains
From here Anniversary Mine Road descends mildly to cross the wash again at ¾ mile. Stay right at the wash, then cut left on the better-asphalted track that mounts the bank. Ascending a modest ridgeline, the route comes to a sign for the Ore Car Mine: perhaps surprisingly, rock collecting is allowed—even encouraged—in this area, as long as it is not at commercial scale.
Sign for Ore Car MineFirst good look into Lovell Wash
There is a junction here, and hikers should stay left; although this track appears less well-established, it is undoubtedly the shorter option. The ridgeline here offers views westward to Lovell Wash, notable for its multi-colored hues and streaks of basalt. Stay on the northwesterly course to another unmarked junction at 1.5 miles; stay left and begin a descent into Lovell Wash. Drop about 50-75 feet in elevation, coming to a point where the gravel road crosses the wash. (Note: This is roughly where visitors with four-wheel-drive vehicles can park to begin the hike.) By now, you have travelled around 1.8 miles.
Heading up Lovell Wash
From here, the scenery improves considerably. Bearing right, the drainage cuts through a narrower section with cream, peach, and orange-colored walls. The sides of the canyon exhibit considerable uplift, while chalky, striated terraces protrude at one point through the sandy wash bottom.
Protruding slickrock in Lovell WashInteresting parallel patterns in the uplifted rockFold and uplift
With the walls rising more than a hundred feet high, the canyon rounds a sharp, left-hand bend, with a small, human-made hole ahead—a clear old ore tunnel. Here the pastel colors are on full display, with streaks of gold becoming more prominent.
Rounding a corner with an old borax mine tunnelAnother colorful bend
Round the bend and enter another, this one treading right, below a beautifully-streaked wall with a sharp peak. Now bending northeast, the canyon suddenly straightens out: more than a quarter-mile ahead, in the distance, the wide watercourse appears to narrow suddenly, with the onward route not entirely clear from this vantage point. This is Anniversary Narrows ahead.
Beautiful striated wallLooking ahead up the straightawayApproaching the narrows of Lovell Wash
Follow the wash, staying straight as an arrow, for ¼ mile, looking back at the rainbow colors of the north-facing wall. Soon the route comes to Anniversary Narrows, where the drainage thins suddenly and beautifully into a stunning, striated passage.
Entering Anniversary Narrows
After an initial twist, the route through the narrows comes to a set of a potholes and a picturesque bowl, a particularly scenic feature and perhaps the most iconic spot in Anniversary Narrows. This feels like the elaborate entry, or atrium, to the narrows.
Approaching the bowl-shaped featureHeading into the narrowsInitial potholes
Initially, the canyon walls are narrow but still more than eight feet apart, but soon the drainage thins to a true slot—hikers can touch both sides with outstretched arms. The twisting walls grow higher, with centuries upon centuries of erosion cutting a passageway through the pancaked sandstone.
Exploring Anniversary NarrowsIn the narrowsLooking back down the twisting passageContinuing through the initial narrows
After several minutes of easy walking, the onward route comes to a large boulder choke, which is relatively easily surmounted. From here the canyon briefly looks like it will open up, but it quickly thins again to a slot, this one harboring a minor, 4-foot obstacle. A steel pipe, perhaps intentionally left here for assistance, helps hikers mount the minor dryfall.
Approaching a boulder jam (can be bypassed on left, or straight on)Looking back at the largest boulder jamMore narrows lie aheadThinning slot4-foot obstacleColorful slot
The narrows continue beyond, with the walls seemingly split into two sections: a lower, narrow slot, and a wider top, separated by a bulky shelf. Thereafter the narrows resemble more of a “V,” thin at the bottom but a wider aperture above. Here there a couple more 2- to 3-foot obstacles, easily surmounted.
At points, the sinuous slot gleams a bright orange or peach, with streaks and crossbedding that add texture to the canyon walls. At last, after about 1/3 mile in the narrows, the canyon finally opens up again. Lovell Wash continues upstream into the Muddy Mountains, but the slot section ends here. This makes for a sensible turnaround point. (Note: Some will choose to venture on, summiting one or two of the nearby peaks, a much more challenging hike with no official trail.)
Nearing the end of the narrowsYours truly in the narrowsLovell Wash opens upA final look at the narrows
Once ready, head back through the narrows of Lovell Wash, admiring arguably Nevada’s best non-technical slot. Make your way back across the straightaway and around the colorful bend with the mine tunnels dating to the 1920s, returning to the spot where Anniversary Mine Road comes down to meet the wash bottom. One can head back up the road to return to the trailhead, but a more scenic alternative that fashions a small loop is to stay in Lovell Wash, following it back to Northshore Road.
Heading down Lovell WashBasalt (?) deposits along Lovell Wash
This route takes hikers downstream through an area that is only mildly scenic at first but soon entertains with a multitude of colors, including one section where the clay turns a greenish, almost turquoise, hue. Farther down, the wash edges an outcrop of reddish Aztec Sandstone and passes one short section where iron oxides and chloride have produced deep pink and gold colors.
Gray-green clay along Lovell WashGolden outcropPastel colors in Lovell WashNear the end of the Lovell Wash walkColorful bedrockNorthshore Road
It is a roughly 1.6-mile walk from Anniversary Mine Road to Northshore Road via Lovell Wash. Climb up to the road, and carefully follow the left shoulder for about ¼ mile to return to the parking area at Calville Wash. This ends a 5.8-mile stem-and-loop hike, one of the most dazzling day hikes in the Lake Mead and Las Vegas area.
Goldstrike Canyon Hot Springs, Lake Mead National Recreation Area, February 2023
Most visitors flock to Lake Mead National Recreation Area—straddling the Arizona–Nevada border, a short drive from Las Vegas—for water-related activities on the United States’ largest reservoir by volume. However, adventure-seekers of the land-bound sort are also treated to a fair amount of challenging and rewarding hikes, especially in the Black Canyon area between Lake Mead and the smaller Lake Mohave. This rugged landscape south of Hoover Dam was carved by the Colorado River and its many tributaries, some of which harbor surprising secrets, including waterfalls, narrow slots, and natural hot springs, best visited in the winter/spring months.
One excellent hike, highlighted in a previous post, is the difficult, 5.75-mile White Rock Canyon – Arizona Hot Spring Canyon Trail Loop. Another, just across the Colorado on the Nevada side, is Goldstrike Canyon, which has become quite a popular destination due to its proximity to Las Vegas and numerous, well-kept hot spring pools. The 5.2-mile out-and-back trek passes through scenic narrows and through several boulder chokes, passing at least four distinct soak pools before ending at a landing along the chilly Colorado River. Despite its popularity, this is not an easy hike: ropes are installed throughout the hike to help visitors negotiate the canyon’s many drops and pouroffs, but the hike requires extensive scrambling, some modest climbing skills, and likely some teamwork to complete. (Note: The trail is closed May 15-September 30 each year due to extreme heat, and the route should not be tried when it is raining due to flash flood threats. The hot springs are open for soaking, but avoid putting your head under due to the risk of Naegleria fowleri, or “brain-eating amoeba.”)
Map of the Goldstrike Canyon Trail, Lake Mead National Recreation Area. Note that the number of rope assists is off a bit (I counted nine, not seven) – see below for more.
The hike
Goldstrike Canyon is one of many branches of the main Black Canyon and is located on the Nevada side of Lake Mead National Recreation Area, between the park’s main Visitor Center and the famed Hoover Fam. Take the exit for Goldstrike Canyon Road off of Interstate 11/U.S. Route 93, passing through a roundabout and parking in a marked parking lot off to the right. As with all popular hikes in the Las Vegas area, getting here early or hiking on a weekday is a must to avoid overcrowding; the parking lot frequently fills by mid-morning on busy weekends.
Not so long ago, one used to be able to drive partway down the canyon – but this is not the case anymore. Instead, after parking, walk partway back up Goldstrike Canyon Road, toward the interstate, and quickly turn right at the signed trailhead, where there is a large information sign with a map and information about the strenuous hike ahead. (Note: The total distance is listed here as 2.6 miles one-way. Many GPS systems are likely to say it is a lot more—and it will feel like a lot more—but note that this is largely because most location services are unable to reliably track you once you’re deep in the narrow canyon. The lack of an accurate reading leads to pinging back and forth that adds considerably to the listed mileage on your GPS even if you have barely moved at all. Also: one drawback of the map at the kiosk is that the number of rope assists is not quite correct—the map shows seven, but we easily counted nine on the total journey. Not all of the ropes are required, as will be noted below, but don’t necessarily peg your distance to the seven ropes noted at the trailhead.)
From the Goldstrike Canyon Trailhead, head eastward down the drainage, which begins as a wide and sandy wash. A massive retaining wall dominates the slope to the left, with the whizz of vehicles audible from the interstate above. Like much of the hike, there is little shade in this portion, but the walking starts out easy and obstacle-free—lulling hikers into a false sense of security that will be rudely interrupted within an hour’s time down-canyon.
Make your way down into the wash, then continue straight as the canyon starts to take form. Unlike most narrow gorges in southern Utah, the rock layers in this portion of the Lake Mead area are primarily volcanic, including pluton, dacite, and volcanic tuff.
After about 3/10 mile of walking, hikers reach a constructed barrier that used to mark the old trailhead, back when vehicles were allowed partway down the wash. Continue down the narrowing wash, rounding a left-hand bend and coming into view of an impressively high overpass. Just as the wash approaches the highway bridge, it darts right, thinning further and entering thicker brush.
Approaching the overpass in Goldstrike Canyon
Boulders begin to accumulate at a higher frequency thereafter, although at this stage, a half-mile into the hike, there are no serious obstacles. After twisting and turning for another quarter mile, the canyon veers nearly due south, toward an impressive wall of black-and-white speckled plutonic rock. As you get closer, a bit of fiery red begins to appear, and the canyon veers eastward again, toward the Colorado.
Heading down Goldstrike Canyon at around the 3/4 mile point
Now having travelled more than a mile, Goldstrike Canyon thins further, and the wash rounds a set of sinuous bends with beautiful views of multihued walls. Catclaw acacias also begin to dot the wash.
The first narrows section in Goldstrike CanyonPretty narrows in the middle portion of Goldstrike Canyon
After routing through an initial set of narrows, there is a split in the drainage, with a minor side canyon heading up to the right. Stay left, then come to the first significant obstacle of the hike: the once-gentle canyon suddenly drops a level, down a precipitous pouroff that is not easily downclimbed. Instead of taking it head on, take a marked detour off to the left, scrambling up and over a steep but negotiable flank, then return to the wash bottom below the dryfall. (Note: Unfortunately, the boulder jam here is partly graffitied, a problem that gets worse as the canyon continues.)
View from atop the dryfallBottom of the dryfall and chockstone
Beyond the pouroff and boulder choke, hikers encounter a second set of narrows, this one more impressive than the first. Wayfaring continues to be relatively straightforward, and the narrows open up briefly to a spot with a little natural arch visible up to the left. The narrows return thereafter, and there is a view ahead to a much more open area with a set of distant power lines.
Thin narrows in Goldstrike CanyonStreaked walls of the narrowsSun and shade in Goldstrike CanyonPlutonic rock along the canyon bottomNarrows in Goldstrike Canyon
This is where, all of a sudden, hikers are greeted by Rope #1, the first of several assisted downclimbs that are required to reach the hot springs and the river. Time for the fun part. Were it not for the large and immensely-helpful steps carved into the rock face, this would be a rather awkward and difficult descent—but with the manmade staircase the downclimb becomes relatively straightforward. Nonetheless, the rope remains handy for balance.
Taking on Rope #1View from the base of Rope #1
Beyond Rope #1, the canyon opens up considerably, with side drainages coming in from left and right. Pass under the power lines and make your way toward the next narrow section, where one will encounter Rope #2—a newly-installed assist that is curious because it is rather unnecessary. The pouroff itself is quite steep, smooth, and slippery, but there is an obvious and straightforward bypass, where no rope is needed, on the left. Those seeking to test their climbing skills, however, can tackle the rope slide for an additional—if superfluous—challenge.
Narrow wash approaching Rope #2Tackling Rope #2 (although there is a bypass)
It is a short walk from here, amid the jumble of fallen rocks, to Rope #3 (Rope #2 on the trailhead map), which—in contrast the second—is quite necessary for negotiating the narrow pouroff. Be sure to keep tension in the rope as you drop down a thin passage to skirt a double chockstone.
Rope #3Goldstrike Canyon view above the first hot springs pool
This obstacle is soon followed by Rope #4 (Rope #3 on the trailhead map), a shorter, 7- to 8-foot drop between two boulder faces. From here there are signs of human construction, with a couple obvious retaining walls a couple feet high. Rope #5 is not far beyond but is also not necessary and can be bypassed on the left.
Occasional arrows advise hikers to take the path of least resistance
Just below, there is a seep that produces hot water, not enough to form a pool, but the trickling water and mild smell of Sulphur leads visitors down to the first of four hot springs pools—Upper Goldstrike Hot Springs, to be precise. This set of pools is tucked away amid the boulders on the right, with the most visible basin very shallow, but the depth (and heat) grows as one wanders farther in behind the blocky boulders. If you have to skip one of the hot springs, however, this is it—more impressive pools lie beyond. Yet if you are concerned about time or weariness, this is a worthy turnaround point for a roughly 4.2-mile out-and-back hike.
The first hot springs poolDescending another drop-off in Goldstrike Canyon
Continuing downstream, a pleasant flat section quickly gives way to another mass boulder choke. There is a short but very helpful rope here at one point—Rope #6—after which hikers engage in a “choose your own adventure” of sorts, with multiple options for tackling the various boulder jams. Rope #7 is also not needed and easily skirted on the right, but Rope #8 is useful and notable for paralleling a trickle of falling water that squeezes under the chockstones on the right. Here there is also a very small pool, with the water disappearing under the rock beyond.
Striated wall in Lower Goldstrike CanyonRope #6Descending Rope #8
Finally, Rope #9 also skirts a moist section, making the descent trickier due to the presence of slippery boulders at the base of the rope assist. This is arguably the most challenging of all the downclimbs—and probably also the hardest to ascend—due to the greasy base and awkwardly chunky rock that forms the bulk of the drop.
The challenging Rope #9
At last, the ropes section is done (until the return journey, of course), and hikers are rewarded with a look at the second hot springs on the right—this one rather small as well but fed by a pretty waterfall of around three to four feet. This (together with springs 3 and 4) is sometimes called Nevada Hot Springs and is usually reinforced with sandbags.
Second hot springs pool
From now on, flowing water is a fixture of the hike, and travellers seeking to save their dry boots for the return ascent may consider switching to water shoes or trying to avoid getting their boots wet. The stream can generally be bypassed on the left as the canyon opens up slightly and hikers pass the third hot springs pool. This is also a nice spot and the deepest pool encountered thus far.
Third hot springs poolMossy seepHot stream flowing through the soaked channelDescending toward the final hot springsColorado River within sight!
But the highlight of the hike is the fourth and final hot springs, by far the largest and most scenic, situated below a mossy channel and just above the Colorado River. The hot springs are fed by a gently-cascading waterfall and are more or less separated into four sections: a large entry pool that is lukewarm at best, a warmer secondary pool off to the left, a very small (and cool) pool at the base of the falls, and a final inset that is the warmest and nicest of the bunch. Here you can submerge much of your body as you sit comfortably on a rock below the surface, enjoying the balmy temperatures of the natural springs. (Note: This arrangement may be different after storms that flood the area, so be sure to check the latest conditions and be open to changes that may occur after February 2023, when I visited.)
Final hot springs from aboveThe best of Goldstrike Canyon Hot Springs
At this point, hikers can either choose to enjoy the hot springs (hope you brought your swimsuit!) or continue down to the end of the hike at the banks of the Colorado River. The river is a short walk of about 1/10 mile, although the flowing hot water can make some of the descents slippery. At last, the warm water of Goldstrike Canyon meets the chilly Colorado in Black Canyon just south of the Mike O’Callaghan-Pat Tillman Memorial Bridge. The Hoover Dam, itself a major tourist attraction, is situated beyond the bridge but just out of view from this spot. Across the river lies the eastern flank of Black Canyon and the state of Arizona.
The O’Callaghan/Tillman Bridge upstreamDownstream view at the Colorado RiverColorful pool where the hot water meets coldAnother look upstream
Although the Colorado River is only 2.6 miles from the trailhead, the numerous fixed ropes and constant negotiation of boulder jams means it will likely take most hikers around 1.5-2 hours to reach this point.
Setting of the fourth hot springsThe final approach to the river
If you haven’t already taken a dip, backtrack to the fourth and best hot springs pool to soak in the warm waters for a bit. Then prepare for the challenging return journey—which can also take a similar amount of time. It is considerably more difficult to climb up the fixed rope assists, and some teamwork may be necessary, especially for Rope #9 and perhaps #8, #4, and #3. Take it slow and steady, and methodically make your way back up the ropes and through the various boulder jams to return to the opening at 1.5 miles and, at last, the return of the easy section just beyond.
Bighorn sheep along the way back
Admire the narrows on the way back, and keep an eye out for wildlife: bighorn sheep are known to frequent the canyon, among others. After 5.2 miles, the hike ends back where it started—at the parking lot at the head of Goldstrike Canyon. All told, this feels like a much-of-the-day hike and is rated as strenuous. However, the hot springs and canyon narrows—in addition to the enduring allure of the Colorado River—make this a memorable hike, one of the most beloved in the Las Vegas area.
Saratoga Gap Trail, Castle Rock State Park, February 2023
Situated in the Santa Cruz Mountains just south of Silicon Valley in the South Bay, Castle Rock State Park is known primarily for its rock climbing—but the 34 miles of hiking trails are worthwhile as well. To avoid the tech bro crowd, visit on a weekday when the vibe is much more subdued, with quiet walks through forests of oak, bay, pine, and madrone; along high ridgelines and narrow creeks; and atop manzanita-lined ridgelines with views as far as Monterey Bay and the Santa Lucia Range. There are several 1-, 2-, 3-, and 4-hour loop options; the below describes a 2-hour version that combines the Saratoga Gap, Interconnector, and Ridge Trails into a 3-mile jaunt that includes a waterfall, chunky Goat Rock, and terrific ridgetop vistas.
Map of Saratoga Gap – Ridge Trail Loop, Castle Rock State Park; created using alltrails.com
The hike
Castle Rock State Park spans more than 5,000 acres of mostly-wooded terrain in the upper San Lorenzo River watershed of the Santa Cruz Mountains, about a 20-minute drive from Saratoga, a suburb of San Jose, California. There are several trailheads, and many will start at the Main Entrance off Skyline Boulevard, but yours truly started from the Overflow Lot just south of the main parking area. On weekends, the latter might be the only option for latecomers; on weekdays, the lot is often closed, but there is (free) parking along the shoulder of Skyline Blvd (Route 35) (see map here).
From the overflow lot, there are at least three separate trails fanning out into the woods. Take the path in the center, next to the large trail map kiosk, which offers information on various hikes of all difficulties. The first stretch of the Saratoga Gap Trail follows a very minor ravine, reaching barely more than a trickle even in the wet season. Off to the right is a 25-foot behemoth known to climbers as “Cave Boulder”—aptly named given its many deep cavities. This is the first of many sandstone outcrops that hikers will encounter on the stem-and-loop.
Follow the well-treaded trail as it descends the woody gully and crosses two bridges, coming to a junction with the Castle Rock Trail after about 200 yards. Continuing right, the Saratoga Gap Trail sheds more elevation as it hugs the left bank of the streambed. After 1/3 mile, with a bridge on the right, the path splits again, this time as the Waterfall Connector Trail comes in from the right. Stay left—do not cross the bridge—as the initial ravine merges with a larger drainage: this is Kings Creek, a relatively prominent tributary of the San Lorenzo River.
Initial “Cave Rock”Saratoga Gap Trail heading downstream
In spring, the creek flows at a pretty good clip, with minor cascades culminating in the much-anticipated Castle Rock Falls. At ½ mile, cross another bridge, then approach another fork: this is the start of the loop portion of the hike. Head left first to reach the falls, continuing on the Saratoga Gap Trail, which takes the low ground (while the right fork begins the Ridge Trail on higher ground).
The Saratoga Gap Trail continues to drop as it keeps Kings Creek on its left, eventually putting a good deal of distance between the singletrack and the streambed. At 6/10-mile, hikers approach Castle Rock Falls from above, with a short spur heading left to a viewing platform. This birds-eye view makes it difficult to view the 70-foot waterfall in full, but the flow in springtime is good, making this one of the most popular destinations in the state park. (Note: There are some social trails leading to the base of the falls, but they are sketchy and unofficial.)
Looking down on Castle Rock Falls
The viewing platform also offers the hike’s first outward views to the skyline beyond, although they are largely obscured by tree cover. Vistas will improve considerably in the next half-mile.
Moss-laden walls along the Saratoga Gap Trail
Beyond the waterfall, the trail continues treading westward, rounding another ravine lined with blocky boulder jumbles. At last, at about 9/10 mile, the tall trees recede, replaced by scrubby chaparral and low manzanitas, allowing for wide vistas to the south and west. On clear days, one can see down across the San Lorenzo watershed to Monterey Bay, with the taller Santa Lucia Range rising beyond. Immediately across the wooded watershed, the ridge in the distance is Ben Lomond Mountain, rising to heights almost as high as Castle Ridge, on which one now stands.
Views into the San Lorenzo watershed from the Saratoga Gap TrailDistant views to Monterey Bay and the Santa Lucia Range
The dramatic views get better as one continues on, rounding a bend below Goat Rock, with the hillside speckled with sandstone outcrops. The tread gets more challenging as occasionally these sandstone slabs protrude onto the trail, requiring some mild scrambling to surmount.
Looking westward toward Saddleback Ridge
The trail briefly returns to the thick woods again as it rounds to a bridge over another tributary ravine, this one feeding a very small stand of second-growth redwoods known as the Patrick Charles Allen Memorial Grove. Soon, however, the path returns back into the open, with additional views south and west.
Open look into the pine-studded valley
The Saratoga Gap Trail continues onward to the Castle Rock Trail Camp, another mile away, but hikers on this 3-mile loop will want to bear right on the Interconnector Trail at 1.4 miles. This relatively uninteresting track involves a short uphill, ending quickly at the wider and more heavily-trafficked Ridge Trail.
View from Emily Smith Observation Point along the Ridge Trail
Bear right on this track as it weaves through a black oak forest, quickly coming to another fork, where a short spur leads right to another nice viewpoint labeled the Emily Smith Observation Point. Check out the vista, which is arguably not as great as those on the Saratoga Gap Trail below, then return to the main trail and bear right. Soon hikers will pass a clutch of rocks where two touching, moss-laden boulders form a small archway that is worth a look. From here the Ridge Trail rises to a sign marking “Dan Seldow’s Fraggle Rock Grove,” one of many memorials named for local residents.
Archway along the Ridge Trail
Even as the Ridge Trail traverses the ridgetop, northward views are elusive throughout the 3-mile hike, with hikers proceeding right at the next junction at the 2-mile mark, bringing them back on the south side of Castle Ridge. The trail is now a thin singletrack again, skirting the south-facing flank in the direction of Goat Rock.
After a junction at 2.2 miles (with a dead-end trail heading right to another scenic overlook), the trail comes to the edge of Goat Rock, from this side a seemingly mild climb. (Note: It is a relatively easy and short Class 2+ scramble up the rock from this side.)
View of Goat Rock from below
But as the trail continues through a narrow gap and down a set of stairs, the full scale of Goat Rock comes into view: the speckled rock face extends 110 feet from top to bottom, with rock climbers seeking to scale it via upwards of 10 different routes. The rock, while not noticeably shaped like a goat head, is notable for its massive cavities, some of which have worn through the rock completely, creating small windows through to the other side.
Another expansive vistaOpen views to the San Lorenzo watershedTall walls along the trail below Goat RockAn example boulder scramble
The best viewing spot for Goat Rock is a protruding ledge at the junction of two trails, including one that heads right to the base of the rock face. The main trail, however, heads left, continuing downhill through a steeper boulder section that requires careful footing. Once down the natural staircase, the path engages two short ups-and-downs before levelling and approaching the main drainage canyon of Kings Creek.
Shady path back to the start of the loop
Soon the trail winds back to the start of the loop portion at the bridge over Kings Creek. Cross the bridge and bear left as the Saratoga Gap Trail climbs steadily uphill, returning along familiar territory for ½ mile. After passing the initial junctions with the Waterfall Connector and Castle Rock Trails, the track ends back at the Overflow Parking Area.
All told, this 3-mile hike is one of the easier in the park, although hiking boots and preparedness for some minor scrambling are a must.
Phantoms View, Phantom Falls Loop, North Table Mountain Ecological Reserve, January 2023
Each year, for a brief period—after recent rains in winter and early spring—the usually dry and dreary landscape of northern California’s North Table Mountain comes alive with color, flowing streams, and stunning seasonal waterfalls. And these are no run-of-the-mill cascades: as the flattops give way to deep, basalt canyons, dozens of waterfalls—Phantom Falls (164’), Beatson Falls (104’), and Ravine Falls (76’) among them—drop steeply off the cliffs, producing a thunderous roar. Spring also brings a bounty of wildflowers, and the towering basalt walls—in some cases marked by columnar jointing—are a sight to behold in themselves.
Situated in the foothills of the Sierra Nevada near the town of Oroville, North Table Mountain Ecological Preserve has a limited official trail system but an extensive network of unofficial footpaths that crisscross the open pastures and hidden canyons. The most popular destination is Phantom Falls, probably the most impressive free-fall in the park, which can be combined with several other terrific waterfalls in the 7-mile Phantom Falls Loop, a moderately strenuous but diverse and highly scenic adventure. Of course, the fun is largely contingent on being here during the right time of year: summer is brutally hot and dry, with most of the streams completely parched by July or August. Plan to come after recent rains and when the hills are a vibrant green—and be prepared for semi-rugged hiking, including unaided stream crossings, rocky traverses, and patches of mud. A map is also essential, as the trails are unmaintained and sometimes disappear completely—especially after the initial foray to Phantom Falls. (Note: I recommend downloading the excellent map from the Chico Hiking Association here.)
Map of Phantom Falls Loop, North Table Mountain Ecological Reserve; created using alltrails.com
The hike
From the town of Oroville in California’s Central Valley, follow the paved but narrow Cherokee Road north, past the Thermalito Diversion Dam, up into the Table Mountain area. Much of North and South Table Mountain are fenced off as private property, but the California Department of Fish and Wildlife protects a 3,300-acre tract known as the North Table Mountain Ecological Preserve. Stay on Cherokee Road for around six miles; as in crests the largely flat mesa, look for a parking lot (with restrooms) off to the left. This is the primary trailhead for hiking in the park and the start/end location for the Phantom Falls Loop.
Even from the parking lot, the views are already stark. Beyond the verdant plateau, one can see across the Central Valley on a clear day to the Coast Range, including the 7,000-foot peak of Snow Mountain (often capped with its namesake fluff). And, of course, the terrain rises off to the east as well, into the northern portion of the mighty Sierra Nevada. In between lies a topography that resembles parts of Ireland or Scotland: rolling pastures, punctuated by streaks of basalt, the predominant igneous rock layer in the area.
Trailhead to Phantom Falls (1.9 mi.)
The route to Phantom Falls (following the Chico Hiking Association map) takes off westward from the parking area, setting out across a relatively level plateau. At first, the path is wide and well-worn, quickly traversing a seasonal stream. But the route soon begins to fade, generally heading northeast in the direction of a fenced boundary: make your way toward the fence corner that separates the preserve from private lands, staying on the right side.
Seasonal stream at North Table Mountain, with Central Valley, Coast Range, and Snow Mountain on horizon
Now, about 2/10 mile from the start, the onward route drops steadily into a sunny ravine carved by Campbell Creek. Cross the stream wherever convenient, but then resist the temptation to follow the fence-line (which most hikers do); instead, cut northeast across trailless terrain. This shortcut avoids unnecessarily steep ups and downs and, despite following no trail, remains manageable as long as one stays the course in a northeasterly direction. There are also occasional metal poles that could more or less act as route markers.
At 6/10 mile, come to an unnamed rivulet, a branch of Campbell Creek, and cross it. Then, minutes later, crest a minor ridge and descend to another tributary, this one featuring a small waterfall on the right. Here the route rejoins the well-trodden path used by the majority of hikers.
Crossing a minor streamMinor cascade
Even as some of the basalt is now exposed in small outcrops, it remains hard to believe at this point that the largely level terrain will eventually give way to deep canyons and hundred-foot waterfalls. But, at 8/10 mile, there is a trail sign that assures one that there are indeed waterfalls ahead, with the route to Ravine and Phantom Falls heading right.
Route approaching Ravine Falls area
Stay right, starting the loop portion of the hike, continuing on the ruddy track that passes a smattering of oaks on the left. Edge northward toward a new ravine, the largest seen thus far. What begins as a modest hollow quickly turns into a warren of basalt-lined gullies. Approaching the rim of a canyon known simply as “The Ravine,” hikers get their first look at the area waterfalls. In the foreground, a modest rivulet turns into the suddenly powerful Ravine Falls (76’), viewed here from above, and—in the distance—one can see a portion of the shorter Ravine Twin Falls (20’ and 46’).
Ravine Twin Falls from a distance
Now thoroughly enticed by the sight of the waterfalls, hikers should continue as the route narrows to a thin singletrack and drops westward into the deep drainage. After a switchback, hikers reach the first solid shade of the hike, where oaks and bay laurel are interspersed with lichen-soaked outcrops, including some up-close exemplars of columnar jointing.
Descending into The RavineColumnar jointing
Follow the sounds of falling water until the trail bottoms out at the crossing of Ravine Creek. Turn right and see Ravine Falls, a worthy destination in its own right. Here the stream falls 76 feet in a single drop, flooding a small pool in the shady gully. (Note: This is technically Upper Ravine Falls—the lower falls will be encountered later—and certainly the more impressive of the two.)
Approaching the fallsRavine Falls up closeYours truly at Ravine FallsMore views of Ravine FallsRavine Falls from below
Some hikers will turn around here, content after a 1.3-mile walk. But most will continue on to Phantom Falls, which is more than twice the height of Ravine Falls. The onward trail crosses to the north side of Ravine Creek and then climbs a set of switchbacks to return to the open sun, leaving the drainage behind (for now). Come to a fence with a small crack in it—despite the appearance of being the end of the road, the trail actually continues past the gate, rising up through a grassy gap.
Looking back toward Ravine Falls from the gateBack to open views across North Table Mountain
Now with expansive vistas again to the Central Valley and Coast Range, the trail to Phantom Falls continues north and west, skirting a mild hillside between The Ravine and the much-larger Coal Canyon. The latter is the largest incision into North Table Mountain and has the most impressive, multi-hued basalt cliffs, near-vertical for more than 100-200 feet. The basalt is the product of lava flows occurring 30-40 million years ago; uplift and then erosion led to the creation of the deep canyon.
Coal Canyon
Follow the trail as it comes to the first views of Coal Canyon and splits—stay right at the signed junction, continuing toward Phantom Falls. Before the big prize comes a smaller one—Little Phantom Falls (124’)—which, if you’re careful along the cliff’s edge—can be viewed just as hikers traverse a small creekbed about a minute or two north of the junction. (Note: A better view, from a distance, can be found a little later.)
Top of Little Phantom Falls
Even with the preview of Coal Canyon, the dramatic vista just beyond Little Phantom Falls still packs a major surprise: suddenly the earth drops 200 feet, and the cliffs form a partly-shaded bowl, punctuated by the stunning display of Phantom Falls (a.k.a. Coal Canyon Falls). Even from a distance, the falls are impressive: they drop 164 feet in a single chute, with the pool obscured by trees. Behind the falls lies a shady cave and overhang. The combination of the falls with the multicolor basalt cliffs makes this spot—known as Phantom View—one of the most picturesque spots in Butte County.
Phantom FallsPhantom Falls and Coal Canyon from Phantom ViewCoal Canyon views
Curious hikers can venture past this viewpoint to the top of the falls—and some very ambitious hikers who are willing to swing way around to the north side of Coal Canyon and descend a dicey chute can reach the base of the cataract. But most will content themselves with admiring the falls from afar at Phantom View before moving on to the remainder of the loop.
Phantom Falls to Beatson Falls (2.2 mi.)
For those just doing the Phantom Falls out-and-back, this is the end of the road: turn around and return the way you came, retracing your steps past Ravine Falls and back over the open pastures to the trailhead. But what’s the fun in an out-and-back when a loop option is available?
To continue the Phantom Falls Loop, make your way back to the nearest signed junction, this time heading right in the direction of Little Ravine Falls. Briefly leave the trail and head right on a thin trace leading back to the canyon edge, where hikers come to a second viewpoint, this one a two-for-one deal: in addition to Phantom Falls, visitors can now also see the bulk of Little Phantom Falls. The two drops—164 feet and 124 feet, respectively—can be captured in a single frame. This vista is known as Phantoms View and is another popular lunch spot for loop hikers.
Phantom Falls and Little Phantom Falls from Phantoms View
After this point, the crowds thin considerably, and the route generally becomes fainter and less well-trodden. Making your way back to the westbound track, however, the onward route is occasionally marked and relatively easy to follow, following a smattering of oaks set back slightly from the canyon rim. At 2.4 miles, come to a cut in a fence and a small oak grove, with a sign marking the trail continuation.
Distant view of Phantom Falls
Soon the path begins a steady descent, back into The Ravine, a capillary of the main Coal Canyon artery. Follow the toyon-studded north flank of the drainage until the path runs through an old stile—with no fence—and eventually comes out into the open at a spot just above Lower Ravine Falls. Here the gently-flowing stream suddenly drops a level, plunging 40 feet into a rockbound pool, with broader Coal Canyon unfolding beyond. While not as striking as Ravine or Phantom Falls, this smaller waterfall is an impressive feature nonetheless.
Little Ravine FallsAbove Little Ravine FallsRavine Creek above the falls
Crossing Ravine Creek above the falls can be tricky, especially at high water. But there are a few spots, backtracking a bit from where the trail crosses the stream, where rock-hopping is possible. Thereafter, look for the unmarked but evident singletrack as it climbs back into the woods. The faint trail switchbacks up a brushy slope—sometimes with downed branches that must be negotiated—and rises to a stile through a barbed-wire fence.
Beyond, the path crests a sunny gap, and the terrain is suddenly flat and devoid of vegetation. The trail follows these flattops, featuring unobstructed views across the Central Valley, for around the next mile.
Back up on the top of the plateau
Traversing the flattops, however, can be tricky, as the trail is hard to distinguish. At the start, the route more or less heads south-southwest on a grassy line between fields of small, basalt rock. Quite often, the area is also marked by cowpies—with the culprits, loving the spring weather, never too far out of sight. (Note: In contrast with the cattle in the Bay Area, which seem very used to hikers, these cows are a bit skittish and a little judgmental—staring down hikers with a confused or faintly menacing look before often running around.)
At 3.5 miles, cross a minor drainage, then rise up to a right-leaning bend, heading toward a reservoir called Western Pond, on private property just beyond the preserve. The trail does not approach the banks of the lake but does encounter the fence-line, where there is another trail sign indicating that it is a mere 0.3 miles to Beatson Falls.
Heading toward Western PondAcross the basalt flats, with Sutter Buttes on the horizon
From here, however, the route gets even fainter, at points virtually non-existent. Here some map-reading and general sense of direction is a must. Generally, head straight for 50-75 yards until you reach a cattle watering hole, then take a hard right, following a faint cattle trail. Bearing west, Western Pond comes back into view, but the route keeps well south of it. Just after the pond becomes visible again, begin to cut south, across unmarked terrain, bearing generally in the direction of Sutter Buttes, an island of mountains in the heart of the Central Valley in the distance.
Beatson Falls
Soon some semblance of a trail returns, and a sign for Beatson Falls is your cue to start looking for the 104-foot waterfall. Head partway downhill into Beatson Hollow, which at this stage is a dramatic canyon with impressively sheer walls. Soon one can see the waterfall nearly in full, dropping through a narrow flume before fanning out into a wider spray. Like Phantom Falls, Beatson is generally viewed from a distance—but the vantage point is dramatic nonetheless.
Beatson Falls an the broader hollowLooking down the canyon at Beatson Hollow
Beatson Falls to Trailhead (3.2 mi.)
By this point, hikers have been at it for about 4.1 miles, but a little more than three miles remain. This final stretch is not as overtly dramatic as what has been seen thus far, but it has a subtle beauty: gently-flowing creeks weave through shallow gullies pockmarked by oaks and willows.\
Beatson Falls againBasalt outcrops
As the eastbound trail pushes past Beatson Falls, it passes above and below basalt outcrops, eventually dropping to a spot where an unmarked tributary meets Campbell Creek, the main sculptor of Beatson Hollow. Follow the creek for 1/10 mile to Beatson Ford, where a sign reveals that the route back to the parking area continues left. (Note: A longer route continues right, across the ford, to Crevice Falls and the so-called “Ladder Falls Loop.”)
Trail beyond Beatson Falls
The next section is peaceful as the path keeps close to the creek before setting out across grassy slopes, crossing a tributary at 5.3 miles. Then the path rises to an open field that continues for a long while, still in Beatson Hollow as it seems to open up. Traverse a pair of shorter, seasonal streams where mud tends to accumulate, then follow the trail as it bends northward, following the Campbell Creek drainage toward its headwaters.
Mild walking in Beatson Hollow
Soon the hollow will split again, and hikers might be able to make out Hollow Falls in the influent off to the east. But the track continues up the westernmost branch heading almost due north. Come to a fence, with private property beyond, at about six miles. Bear left, never crossing the fence but climbing steadily out of the hollow. Eventually the path encounters a willow thicket that can pose some temporary obstacles, and the route twice crosses the thin stream.
Shady path in Beatson Hollow
Back on the left side, look for a rivulet that branches off from the main creek to the right. Less than 100 yards up this narrow side stream lies the modest but pretty Little Hollow Falls, a mossy chute that is worth a quick look.
Little Hollow Falls
Back on the main trail, the incline steepens, and hikers are faced with a choice of a steeper but shorter ascent up and out of the canyon to the left, or a longer but easier track heading straight. Both culminate back on the flattops of North Table Mountain, leaving Beatson Hollow behind.
Happy cows at North Table MountainExiting Beatson Hollow
Soon you will find the initial junction where the loop portion began—hours ago. Bear right, retreading familiar territory as the path drops to the branch of Campbell Creek with the very minor waterfall. After this, follow the cross-country route described earlier, or continue on the longer and harder path that skirts the fence line. Back at the initial fence corner, find the final track heading back, southeast across the open pasture, back to the trailhead. This marks the end of the 7.3-mile stem-and-loop journey.
Coronado Peak Trail, Coronado National Memorial, November 2022
Gaining 300 feet in elevation, the Coronado Peak Trail tackles a summit at the southern end of Arizona’s Huachuca Mountains, one of many “sky islands” in the area. Named for famed Spanish explorer Francisco Vasquez de Coronado, this is the most-visited peak in Coronado National Memorial, offering views of Montezuma Canyon, the San Rafael Valley, and Sonora, Mexico. The climb is short but steep, mostly comprising stone steps in full sun exposure, ending at a shaded viewing platform after 4/10 mile. Hikers can combine this out-and-back with a longer jaunt on the Joe’s Canyon and/or Yaqui Ridge Trails—and Coronado Peak is a prominent landmark near the southern terminus of the 800-mile Arizona Trail, which begins just below the mountain.
Map of the Coronado Peak Trail, Coronado National Memorial
The hike
Coronado National Memorial celebrates the 1540-42 Coronado Expedition, which set out from Spanish-run Mexico in search of a fabled “Golden City” of Cibola. The Spanish party passed through this area in mid-1540 before reaching a series of Hopi and ancestral Puebloan villages in present-day Arizona and New Mexico.
Today, the relatively small park abuts the U.S.-Mexico border and includes a small section of the Huachuca Mountains, one of the larger ranges in the area. Most visitors will enter the memorial from the east (via Sierra Vista or Bisbee), following East Montezuma Canyon Road to the Visitor center and end of the pavement, after which the road continues as a slow but 2-wheel-drive gravel track. Ascend to Montezuma Pass, where there is a relatively large parking area with sweeping views. To the north lies the ridge leading to Miller Peak (9,470’), the highest point in the range. To the east, one can see down Montezuma Canyon to the Visitor Center and vast San Pedro Valley, bisected by the border wall separating the United States and Mexico. To the west, the long flats of the San Rafael Valley eventually give way to the Patagonia Mountains, concealing the border town of Nogales beyond.
View east into Montezuma Canyon
The southward view is blocked by a ridgeline and the summit of Coronado Peak, giving visitors an incentive to tackle the 8/10-mile round-trip hike. From the parking area, look for a signed trail heading south, past an initial sign with a trail map. The route begins like it ends: with a series of stone steps, ascending the grassy hillside.
Start of the Coronado Peak TrailCoronado Peak
Look for pinyon, juniper, white oak, and yuccas as the Coronado Peak Trail passes a communications tower on the right and rises to a bench and junction. The Joe’s Canyon Trail heads left, while the path to the summit bears right; follow the latter, rising again, with improved views back to Miller Peak and the Huachucas.
Bench with westward views to San Rafael ValleyView back north to Montezuma Pass and Miller Peak
Soon the trail swings back and forth between east- and west-facing sides of the main ridge, with open vistas nearly throughout. Catch your breath at various interpretive waysides, then continue south toward the summit.
Montezuma Canyon viewNearing the top
The final push involves much wider switchbacks and stone staircases, finally culminating at the golden summit, where there is a shade ramada and benches facing southeast. Here the landscape south to Sonora opens up, with views extending as far as Sierra de la Mariquita and the northern ranges of the Sierra Madre Occidental.
Westward views from the summitSouthwest, across the border wall, to Mexico
Two interpretive signs at the ramada explain the Transatlantic Trade and the legacy of Coronado, whose expedition was deemed a failure but facilitated further Spanish conquest in what would later become the western United States.
Southerly look into Sonora, MexicoEast toward Bisbee and Douglas
When ready, return the way you came—or continue on the Joe’s Canyon Trail to the Yaqui Ridge Trail or as far east as the Visitor Center. Doing just the 8/10-mile out-and-back should occupy hikers for around 45 minutes to an hour, making this one of the shortest and easiest hikes in the park.
Inspiration Point Trail, Chiricahua National Monument, November 2022
At first glance, the Chiricahua Mountains of southeast Arizona appear little different from the hundreds of other small ranges of the Basin and Range area, which spans from southern Oregon and Idaho down to Mexico: an abrupt north-south range rising from open, scrubby valleys, seemingly the same pattern of dry escarpments with the usual features of rocky peaks and some limited woodlands. But the Chiricahua range harbors a secret that sets it apart from the others: a hidden landscape of thousands of naturally-carved pinnacles composed of yellow-brown rhyolite tuff, evidence of ancient lava flows, uplift, and intense erosion. The result is a “wonderland of rocks” resembling a slightly more subdued version of Bryce Canyon—but spectacular in its own way. Like Bryce, there is an extensive trail network crisscrossing the landscape, with far and away the best option being the Chiricahua Big Loop, an 8.8-mile excursion that combines several trails in Chiricahua National Monument, included the famed “Heart of Rocks” area. The extensive scenery and bounty of spur trails easily make this challenging hike a most-of-the-day affair that visitors are unlikely to forget.
Map of Chiricahua Big Loop, Chiricahua National Monument; created using alltrails.com
The hike
Chiricahua National Monument spans 12,000 acres in the northern half of the Chiricahua Mountains, with the entrance situated about 35 miles southeast of Willcox, Arizona. The range is located along the boundary of the Sonoran and Chihuahuan Deserts and approximates the northern terminus of the lengthy Sierra Madre Mountains, located primary in neighboring Mexico. The Chiricahua Mountains—named for a group of Apache who once controlled the area—are one of many so-called “sky islands,” or mountain ranges that appear to rise from a surrounding desert “sea.”
As one approaches the Chiricahuas, however, visitors quickly realize that this is no usual mountain range. Rather, the opening of Bonita Canyon—which offers passage into the park—is lined with tall sides dotted with colorful rhyolite, a volcanic rock layer thought to have been deposited around 27 million years ago. The volcanic eruptions left behind a caldera, and the rhyolite tuff has since eroded into wild shapes, with the largely concentration situated at the heads of Bonita and Rhyolite Canyons.
Follow Bonita Canyon Drive—the main road through the park—for 7.5 miles, stopping at the Visitor Center along the way for a map and additional information. The scenery improves as the drive snakes through Bonita Canyon and then hugs an east-facing hillside with views to Cochise Head (8,113’), the highest peak in this northern part of the range. The East Whitetail Creek drainage leads south and east, out of the park, toward the next basin, which straddles the border of Arizona and New Mexico.
Bear right at the junction for Sugarloaf and Echo Canyon, then pull into the first parking area on the left: this is the Echo Canyon Trailhead, the staging point for several popular hikes in the park. (Note: The lot is relatively small, so arriving on a weekday or early in the morning on a weekend is wise to secure a spot.) While the wonderland of rhyolite is not visible from the parking area, the high hump of Sugarloaf Mountain (7,310’)—composed of volcanic dacite—dominates the vista to the northwest.
There are bathrooms at the trailhead, as well as a trail map and sign with suggestions for some shorter hikes—such as the 3.3-mile Echo Canyon Loop Trail—which will be mostly covered as part of the larger Chiricahua Big Loop.
Echo Canyon Trail to Upper Rhyolite Canyon Trail (1.5 miles)
The “Big Loop” begins with an easy and slightly downhill walk across a chalky highland in the scrubby chapparal and pinyon/juniper woodlands, coming quickly to an intersection with the Massai Point Trail. Stay right here, beginning the loop portion of the hike.
From here the Echo Canyon Trail climbs a short hillock with the first rhyolite outcrops coming into view off to the left. There is a partial view south at around 2/10 mile, but the real action comes about 175 yards later, when hikers get their first good look north into Echo Canyon, a tributary of Rhyolite Canyon that boasts some of the tallest rock pinnacles in the park. The canyon is set just below Sugarloaf Mountain, which is topped by a viewing gazebo, to the north.
Rhyolite spires of Echo Canyon below Sugarloaf Mountain
As the trail bounds from one side of the ridgeline to another, hikers soon get their first good views south into the Echo Park area, also boasting a large collection of hoodoos. Mushroom-shaped outcrops become more common alongside the trail, and the coloration and detail of the eroded formations becomes more pronounced as the hike proceeds.
Mushroom-shaped rockEcho Canyon Grottoes
At about ½ mile, the passage noticeably narrows as it squeezes between protruding outcrops, and a sign indicates that one has reached the Echo Canyon Grottoes, which resemble thin cave channels that can be accessed off to the right. Depending on the lighting, this area can make for some spectacular photos (resembling othersimilarlandscapes featured on this blog).
Cavern-like passage in the Echo Canyon GrottoesNarrow passage at entrance to grottoesExploring the grottoes
Beyond the grottoes, the Echo Canyon Trail cuts through a few more narrow passages, interspersed with excellent views north and south into the Wonderland of Rocks. One outcrop at about 2/3 mile makes for a nice lunch/snack spot facing north into Echo Canyon, where the rhyolite pillars take on a yellow and almost magenta hue.
Spires of Echo CanyonAnother look up Echo Canyon
Soon a more steady downhill begins, starting with a set of switchbacks where loose rock is aplenty—so go slow and be careful on this track, which is prone to causing ankle sprains. Pass through another thin notch, then continue down more switchbacks, shedding elevation quickly.
Rhyolite outcrops along the Echo Canyon TrailDeep fissures along the trailNarrow passage
At about 1.1 miles, hikers reach a sign for Echo Park. By now hikers are largely below the pinnacles, which rise dramatically in columns above.
Pinnacles along the descent into Echo ParkFormations above Echo Park
Cross the main Echo Canyon drainage at 1.2 miles, then follow the now-relatively level trail as it hugs the southern flank. Views open up to the broader Rhyolite Canyon, which connects this area with Bonita Canyon and the Visitor Center area. Lining the canyon, especially on the north, is a long line of rhyolite pinnacles.
Looking up at the pinnacles from Echo Park
At 1.4 miles, the Echo Canyon Trail winds around a left-hand turn, curving around to the north side of the main Rhyolite Canyon drainage, leaving Echo behind. This gorge harbors similar formations to the east.
Mouth of Echo Canyon as it empties into Rhyolite CanyonViews into Upper Rhyolite Canyon
The trail continues for another 50 yards until it reaches an intersection with the Hailstone Trail and Upper Rhyolite Canyon Trail. Most hikers, doing the 3.3-mile Echo Canyon Loop, will stay left, but the adventurous and hearty explorers of the Big Loop will want to stay right on the Upper Rhyolite Canyon Trail.
Upper Rhyolite Canyon Trail to Sarah Deming Trail (1.0 miles)
The next section, more distant from the stone formations, has a distinctively different feel as it dips into a riparian woodland with more shade and fewer vistas. A steady downhill takes one eastward into Upper Rhyolite Canyon, then bends south and crosses the main wash at 1.75 miles. Follow the streambed on the right, now skirting the north-facing slope. Cross back over to the right side of the drainage at 1.9 miles, then back again minutes later. Repeat the crisscross three more times, ending up back on the right side of the canyon.
Descent along Upper Rhyolite Canyon TrailViews down Rhyolite CanyonLooking back north from south side of Upper Rhyolite Canyon
After rounding a bend, the trail descends to clear the wash bottom a final time, then ascends, surprisingly steeply, to a point where the path rises again above the dense tree cover. Enjoy the extended vistas down-canyon, passing the mouth of Sarah Deming Canyon and coming to a junction again at 2.5 miles. This is the intersection with the Sarah Deming Trail, the next leg of the journey.
Sarah Deming Trail to Heart of Rocks Loop (1.5 miles)
The initial climb to the junction was just a preview of what is to come on the Sarah Deming Trail, by far the most difficult part of the loop. Here hikers will gain around 850 feet in elevation over the course of 1.5 miles, with the hardest part coming in the final ½ mile.
Junction with Sarah Deming TrailUpper Rhyolite Canyon from Sarah Deming Trail
Like the other forks, Sarah Deming Canyon too is lined with rock formations, although the denser woodland cover blocks much of it from view for at least the first half of the climb. Edge eastward, then south, as the trail stays well above the canyon floor, climbing through a mix of deciduous and coniferous tree cover.
Climb steadily for nearly a mile before the path briefly levels and crosses to the east side of the drainage through Sarah Deming Canyon, initiating the final ½-mile ascent out of the canyon and into the Heart of Rocks area.
The incline steepens and vegetation lessens as hikers slog up the hill and are at least rewarded with better views as the ascent proceeds. The trail more or less makes for an easement in the rhyolite rim, some 300 feet above the canyon. Expect many stone steps in this section—a testament to decades of trail work and maintenance.
Climbing to the gap above Sarah Deming Canyon
At last, about four miles into the Big Loop, the incline eases and the Sarah Deming Trail ends at an intersection with the Big Balanced Rock Trail and the Heart of Rocks Loop. The latter is what makes the lengthy slog worthwhile, and constitutes a “loop-within-a-loop” that occupies hikers for the next 8/10 mile.
Heart of Rocks Loop (0.8 miles)
Before heading onward, look right for a preview of Big Balanced Rock, an imposing, hourglass-shaped spire that is one of the most well-known formations in the park. Hikers will return to get a better look, but for now, bear left on the short connecting spur to the Heart of Rocks Loop.
Big Balanced Rock lurking beyond
The next section is actually downhill, clearing a dry drainage with plenty of shade and neat narrow passages. Look for a sign for the Heart of Rocks Loop heading left, however, after which the trail climbs again.
First of several notches along the Heart of Rocks LoopHeart of Rocks Loop
Proceed through a slender channel between rhyolite fins, then climb to a view of Pinnacle Balanced Rock—a smaller but also impressive version of Balanced Rock—on the left. Surely erosion will not let this precariously-balanced stone stay as it is for long…
Pinnacle Balanced RockAnother narrow notch along the trailPlump outcrops along the trail
After Pinnacle Balanced Rock, ascend through two thin slots and up to a view of a formation called Old Maid on the right. Now proceed downhill in the direction of Camel’s Head, a distinct hoodoo that remains visible throughout much of the loop.
Old MaidCamel’s Head
After clearing another notch, the trail levels off, and spurs off to the left offer vista points overlooking Rhyolite Canyon and the vast valley to the northwest, with the Dos Cabezas, Winchester, Galiuro, and Pinaleño Mountains beyond. This is one of the best overlooks in the park.
Spectacular view from the Heart of Rocks LoopEastward view in Heart of RocksRhyolite Canyon, with Dos Cabezas on the horizon
Pass Thor’s Hammer on the right and slip through a notch with a small rock arch on the left, with additional options for views down Rhyolite Canyon beyond. Soon the trail makes a right turn and proceeds eastward, leaving the densest jungle of rocks behind but proceeding into another set of formations on the other side of an unnamed drainage.
Thor’s HammerSmall archwayView north to Echo Canyon and Cochise HeadPinnacles galore in the Heart of Rocks
Follow the high shelf as it passes a view, through a narrow window, to a pair of formations humorously named Punch and Judy. There are also views north to Echo Canyon, Sugarloaf Mountain, and Cochise Head, with the highlands dotted with thousands of rhyolite pinnacles in between.
Punch and Judy along the Heart of Rocks Loop
There is one curiously-perched outcrop known as Duck on a Rock (although I missed it), as well as two tall slender pinnacles known as the Kissing Rocks—after which the trail heads southward to close the loop. Proceed downhill and find a west-east ravine that hikers will follow to the drainage that splits through the Heart of Rocks, reaching the initial junction that started the circuit at 4.7 miles.
Kissing RocksBelow pinnacles along the Heart of Rocks Loop
Bear left, traversing familiar territory as one climbs back to the junction at the pass below Balanced Rock. This time head left, setting off east and leaving the Heart of Rocks behind.
Big Balanced Rock Trail and Inspiration Point Trail (2.0 miles)
Aside from Big Balanced Rock, which is visible off to the right immediately after the trail fork, the scenery in the subsequent section is more subdued, with the rhyolite formations eventually receding. After an open stretch of chapparal, the denser tree cover returns, and hikers generally follow a high ridgeline with occasional dips and bends.
Big Balanced RockAnother look at Big Balanced RockTowering steeples along the Big Balanced Rock TrailA look back at Heart of Rocks (notice Camel’s Head?)
The Big Balanced Rock Trail offers the loop’s best southward views, however, to the higher peaks of the central Chiricahuas—much of this landscape is protected as part of the Chiricahua Wilderness. There are also distant views to Cochise Head and the Dos Cabezas Mountains to the north.
Southward look across Chiricahua MountainsChiricahua tarantula along the trail
For the most part, this mostly-level section is an opportunity to gain time possibly lost while wandering the Heart of Rocks, with hikers allured by the prospect of seeing Inspiration Point, where the rhyolite wonderland of rocks returns in a spectacular, sweeping vista.
Big Balanced Rock Trail
At 5.75 miles, a mile from the Heart of Rocks Loop, come to the junction with the Inspiration Point Trail, a one-mile out-and-back that is well worth the extra effort. Head left on the mostly level track as it follows a ridgeline between Totem and Hunt Canyons, dotted with junipers, yuccas, cacti, and scrub.
Rhyolite Canyon from Inspiration PointTotem Canyon and Rhyolite Canyon from Inspiration Point
While there are few views along the way, they come suddenly and astonishingly at the end of the ½-mile trail, where hikers can peer out from Inspiration Point to the myriad pinnacles below. The views north to Echo Canyon, Sugarloaf Mountain, and Cochise Head are retained, but perhaps the most dramatic is the look west into Totem Canyon, named for the high totem-pole-shaped spires that rise to form the canyon walls. Visitors can also see north and west across the valley toward Willcox and the Dragoon Mountains.
Totem CanyonView north to Cochise Head
Inspiration Point, due to its remote location, is often not very crowded—indeed, I had it all to myself. But when you’re ready, continue back along the ½-mile trail to the junction with the Big Balanced Rock and Mushroom Rock Trails, heading left.
Panorama from Inspiration Point
Mushroom Rock Trail to Ed Riggs Trail (1.2 miles)
By now, hikers are likely to be rather tired and ready to wrap up the hike. But there is still about two miles remaining. The Mushroom Rock Trail leads east from the junction and descends into a shallow section of Hunt Canyon, a relatively featureless tributary of Rhyolite Canyon.
Hunt CanyonMushroom Rock Trail
Clear the canyon drainage at 6.8 miles, then follow the east flank northward to a brief set of switchbacks, after which the trail closely hugs the canyon bottom. Trace Hunt Canyon to its end, now returning to Upper Rhyolite Canyon, where the rhyolite spires become more prominent again. The sole named feature in this area is Mushroom Rock, which rises high above the drainage off to the left and is pointed out by a small sign along the trail.
Mushroom RockHigh canyon along Mushroom Rock TrailLooking back toward Inspiration Point and Totem Canyon
Continue along the Mushroom Rock Trail as it heads west and clears a drainage and boulder choke at around 7.8 miles. The views of the surrounding spires here are impressive, especially as one gets another look at Totem Canyon from its base. At 7.9 miles, the trail comes to a junction with the Hailstone and Ed Riggs Trails, both part of the shorter Echo Canyon Loop.
Ed Riggs Trail and Massai Point Trail to Echo Canyon Trailhead (0.9 miles)
The final mile is now upon you; make a right turn on the Ed Riggs Trail, which offers a much milder return to the trailhead than the nearby Echo Canyon Trail. Follow a side drainage north, back toward the rim at Massai Point, staying left as the side canyon forks shortly upstream from Rhyolite Canyon.
Spires of Rhyolite Canyon from the Ed Riggs Trail
Hikers are back in a position where they can get up-close looks at the rhyolite pillars, which take on a multitude of shapes, from plump outcrops to tall, slender spires. Continue to trace the path uphill, flirting several times with the (usually dry) drainage and cutting through gap below Massai Point.
Below the curious spiresNear the junction with the Massai Point Trail
After a brief level period, climb again to the junction of the Ed Riggs Trail and Massai Point Trail, bearing left toward Echo Canyon Trailhead. The final ¼ mile follows the Massai Point Trail within striking distance of Bonita Canyon Drive, with the sounds of traffic heard for the first time in hours.
A final uphill stretch leads back to the chalky ridgeline where the hike began—and the initial trail split. This time head right and follow the short path back to the trailhead, ending the 8.8-mile journey.
Final look at Sugarloaf Mountain
The Chiricahua Big Loop is a satisfying but relatively strenuous hike that should not be taken lightly: the elevation gain and loss is significant and the trail rocky and circuitous. Hikers should budget around 5-7 hours to complete the circuit, including stops to take in the beauty of the “wonderland of rocks” along the way.
Fort Bowie Trail Loop, Fort Bowie National Historic Site, November 2022
– Civil War Series –
At a time when most eyes were on the major battlefields of the Civil War out east, the Union Army was engaged in 1962 in a series of smaller skirmishes in the American Southwest with Confederate cavalry and an ongoing conflict with various bands of the native Apache. As Confederate forces made designs on New Mexico Territory, which included what would become Arizona, the U.S. Army sent a column of the 5th California Volunteers to head off the threat, but they were drawn into the wider Apache War in the Battle of Apache Pass (15-16 July 1862). As the contingent moved through the Chiricahua Mountains in southwest Arizona, they were ambushed by a group of native Americans led by Cochise (1805-1874), for whom present-day Cochise County is named. The battle, which ended in a defeat for the Chiricahua Apache, nonetheless prompted the Union Army to fortify the area, establishing Fort Bowie later that year.
Today, visitors can tour the remains of Fort Bowie and trace the steps of the Chiricahua Apache and California soldiers who engaged in the battle. But there is a catch: unlike nearly every other Civil War fort in the National Park Service, this one is only accessible by way of a 3-mile out-and-back—or slightly longer loop—hike from Apache Pass Road. Along the way, hikers will pass several historic ruins, a cemetery, and Apache Spring—the latter a key source of water for the Apache Indians and Union soldiers who occupied the area. The below description covers a roughly 4.4-mile stem-and-loop, including a short spur to the original fort site, a loop around the larger “second” fort, and an alternative return route via Overlook Ridge, which offers nice views to Siphon Canyon, Fort Bowie, Bowie Peak, and Apache Pass.
Map of Fort Bowie National Historic Site
The hike
Fort Bowie National Historic Site is situated in southwest Arizona, about 13 miles south of the town of Bowie on Interstate 10. Visits are often combined with trips to nearby Chiricahua National Monument. Reaching the Fort Bowie Trailhead requires traversing a usually well-graded gravel road that follows an easement between the Chiricahua and Dos Cabezas Mountains, cutting through a classic Sonoran Desert landscape before rising to a scrubby savanna with several seasonal drainages that support larger tree life.
Just east of the crest of the pass, look for a reasonably large parking area on the north side. Across to the south is the start of the Fort Bowie Trail, accompanied by a picnic gazebo, information boards, and a map of the park. Off in the distance to the southeast, one can see the hulking heights of Bowie Peak (6,982’) and the protruding head of Helen’s Dome (6,376’).
View toward Fort Bowie, Bowie Peak, and Helen’s Dome from the trailhead
The hike begins with a mild descent, dropping to clear the main drainage through Cutoff Canyon. Just beyond lies the stone foundation of an old mining cabin, built by a local prospector well after the closure of Fort Bowie in 1894. The builder, Jesse L. Millsap, was killed while digging a well in 1929 and is buried at nearby Bowie Cemetery, 15 miles to the north.
Remains of Millsap’s cabin
Stepping past the cabin ruins, the trail climbs back out into the open before dropping again to cross another drainage. After this comes a third, short wash traverse, after which the path rises to a golden, grassy, and sun-soaked plain. Looking back, one can see Government Peak (7,580’), one of the highest promontories in the Dos Cabezas Mountains. The windswept hillsides to the north are noticeably less vegetated than the landscape ahead to the east; this is in part due to the soil transitions of the area and presence of Apache Spring just below Fort Bowie.
Looking back toward Apache Pass and Government Peak
Head toward the spring and fort, coming to a sign for the Parke Camp Site at around ½ mile. A full eight years before the Battle of Apache Pass, U.S. Army Lieutenant John Parke led a surveying trip to this area, camping at this spot in March 1854. The objective was to identify a route through the mountains for a long-distance railroad line: Apache Pass, while passable, was far more tedious than the flats to the north, which Parke settled on as a better alternative a year later; by 1880, the railroad through Willcox and Bowie was complete.
Park Camp Site on the golden plain
The field on which you walk, however, was not just notable for hosting the Parke expedition. More famously, it was the locus of the 1861 “Bascom Affair”—the event that triggered years of hostilities between the U.S. Army and Cochise’s band of Chiricahua Apache. In January 1861, at nearby Sonoita Creek, a Tonto Apache group kidnapped the 12-year-old stepson of local rancher John Ward, prompting the army to send a contingent led by Lt. George Bascom to try to locate and recover the boy. False intelligence led Bascom to pin the blame for the kidnapping on Cochise, whom Bascom tracked to this location in February 1861. Here Bascom set up a meeting with the Chiricahua leader and attempted to imprison him and his family; Cochise, however, escaped, fleeing up and over the modest hill visible off to the left.
Bascom Affair interpretive wayside
An interpretive sign—located just past an ensuing trail junction—tells the story of this encounter, which triggered a series of tit-for-tat attacks. In the weeks following the initial incident, Cochise took several white Americans hostage, and Bascom’s party killed the Chiricahua in their custody. This set off decades of bad blood between the longtime natives and the encroaching settlers, prompting the U.S. Army to hastily construct Fort Bowie in late 1862.
The aforementioned trail fork marks the start of the loop portion of the hike. Head right first, passing the Bascom Affair sign on the left and beginning a counter-clockwise circuit around the valley. Soon hikers come to the Stage Station Ruin, once an active outpost used by soldiers and travelers on the Butterfield Trail, an overland stagecoach line used by commercial passengers and the U.S. Mail service for a brief period from 1858 until 1861. Take the short spur here to see the full stone ruins and read a second sign on the Bascom Affair.
Stage Station Ruin along the Butterfield Route
Less than a minute’s walk from Stage Station, the trail stays straight through a four-way junction with a hiking trail that follows the old Butterfield stagecoach line. (Note: This trail, however, was closed as of November 2022.) Just ahead, with a wider, sandy drainage shaping up to the left, hikers reach the neatly-fenced Post Cemetery, which was constructed before Fort Bowie but came to be the resting place for many who served there. The military personnel and their dependents who were buried at the cemetery were later moved, leaving only civilians behind. (Note: See a listing of all those identified who are interred at the cemetery here.)
Post Cemetery
The onward path continues by rounding the northeast corner of the cemetery and then crosses the wide wash. Despite being downstream from Apache Spring, this basin is dry for most of the year. Now on the north side of the drainage, the Fort Bowie Trail approaches a partly-rehabilitated ruin on the left: the contours of the Chiricahua Apache Indian Agency, once the office of U.S. Indian Agent Thomas Jeffords, who “governed” the Chiricahua Apache in the area from 1875 to 1876.
Chiricahua Apache Indian AgencyRecreated Chiricahua home
Moving on, the shade grows denser—welcome on a hot day—and the trail passes a small interpretive sign marking the site of the Battle of Apache Pass: it was here, along the Butterfield Road, that 96 California Volunteers were ambushed on 15 July 1862; the U.S. soldiers endured five casualties (two killed, three wounded) but were able to repulse the Apache in a counter-attack at the nearby spring.
Steps later, hikers come to a reconstructed representation of a thatched hut used by the local Chiricahua Apache. From here the trail crosses the streambed and enters a lovely, well shaded gully with taller trees. Flowing water means Apache Spring is near, and indeed hikers pass it minutes later: the site is protected by a stone retaining wall, seemingly kept up by the Park Service. The trail suddenly climbs a steep staircase to clear the spring and rises back into the open after the brief foray under the lovely tree canopy.
Apache SpringSpur toward First Fort Bowie
By now one can begin to make out parts of Fort Bowie ahead, as well as the official Visitor Center, open daily from 8:30am-4:00pm. But it’s worth first taking a minor detour, with a spur trail heading off to the right for 300 yards to the ruins of the O.G. Fort Bowie, a much smaller outpost that was built on a hill overlooking the spring and Siphon Canyon. Construction began less than two weeks after the Battle of Apache Pass, and the original fort was abandoned in favor of the new, larger installation constructed just to the east in 1868.
Views from First Fort Bowie
This spur trail is much thinner, with grasses encroaching onto the path, but the route is reasonably easy to follow—first past an initial ruin, then up a side gully, culminating with a short loop around the hilltop. The remains of the fort here are modest, but the views are excellent, with a clear look across the valley to Post Cemetery, Cutoff Canyon, and Government Peak. One also gets a good shot of Helen’s Dome, a granite knob frequented by local climbers.
Ruins of First Fort Bowie
After rounding the loop, return the way you came on the spur path, coming back to the main track. By now hikers have travelled around 1.8 miles, and a persistent climb brings hikers up to the plateau with the “new” Fort Bowie and the modern Visitor Center.
Howitzer at Visitor Center
Fort Bowie is notable for being one of the few (only?) places in the National Park Service system where one has to walk more than a mile to reach the main visitor center. And yet this perhaps part of the appeal – the lack of a visitor center means only prepared and determined visitors are likely to make the journey. On many days, hikers will have the Visitor Center to themselves – except for one or two hearty park rangers, of course, who, to be fair, tend to use the road (also open to vehicles with disabled placards) to access this point.
After exploring the Visitor Center and bookstore, head back outside toward Fort Bowie. Just past the howitzer cannon, head south on a wide, dirt track into “Second Fort Bowie,” which became the epicenter of local U.S. Army operations after construction in 1868. The fort was never attacked, but many of the soldiers sent out from here on patrols certainly were, as the famed Geronimo took up the fight against the encroaching settlers after Cochise died in 1972.
Ruins at Fort Bowie
The ruins of the fort are modest, with crumbled adobe and low, overgrown stone foundations. Among the stone ruins lie the officer quarters, trading post, and mess hall, scattered atop the plateau, with another gap in the mountains visible off to the east. Make a clockwise loop around the fort remains, including a short spur in the southeast corner that ends at the “new hospital.” The trading post—Sutler’s Store—offers the best views down to the valley from which you came, and each structure has a small interpretive sign offering a short historical description.
Officer quartersFlagpole at Fort Bowie
It is somewhat easy to stray from the rectangular loop around the fort, but the Visitor Center off to the north remains in view much of time, making navigation back to the start relatively straightforward. All told, the circuit and various spurs cover around a half-mile.
Adobe ruins at Second Fort Bowie
After exploring Fort Bowie, stop by the bathroom at the Visitor Center and then prepare for the return journey, with hikers having two options. The first is to return the way you came, past Apache Spring. The second and preferred choice, however, is to follow Overlook Ridge back to the start of the loop, offering a more strenuous but considerably more scenic return.
The climb up Overlook Ridge begins immediately behind the Visitor Center on the northwest side, with the thinner and rockier path ascending an ocotillo-dotted slope. The climb lasts around a quarter mile before easing, with hikers gaining grand views down to Fort Bowie and across the valley to Bowie Peak and Helen’s Dome.
Views down to Fort Bowie from Overlook Ridge
A stone marker with a short inscription tells the story of the closing of Fort Bowie, which was abandoned in 1894. By then the threat from the Chiricahua Indians had largely subsided, and the remaining native population was moved into reservations, marking the end of the so-called Apache Wars.
Enjoy the classic Sonoran landscape as one traverses Overlook Ridge, with yuccas and small cacti scattered among the ocotillos and brush. Reaching the summit at around 2.9 miles, there are excellent views north—down Siphon Canyon—and south and west, across the main valley.
Limestone ridgelineViews down Siphon Canyon
About ¼ mile later, there is a short spur left that ends at a vista point and another explanation of the Battle of Apache Pass—this spot offers a bird’s eye view of the former battlefield. After returning to the main path, continue west as the trail descends the wavy limestone ridge to a series of additional overlooks. From here the descent steepens as the trail engages a set of switchbacks that brings hikers back down into Siphon Canyon.
Prickly pear cactusViewpoint above the battlefieldDescent back toward the valley
Working back across the floodplain, come to a junction again with the Butterfield Trail, then make your way across the wide and sandy drainage. On the west side, the larger vegetation recedes, and hikers enter familiar territory, edging across the grassy plain encountered early in the hike.
Return to the open field
From here it is a short walk back to the start of the loop section, with more than 3.8 miles of walking (including all the spur trails mentioned) now behind you. Take a look back toward Fort Bowie and Bowie Peak, then proceed northward, retracing the initial ½-mile stretch to return to the trailhead at Apache Pass.
This historic hiking trail clocks in at around 4.4 miles—including the several spurs and circuit around the main fort complex—and is a pleasant half-day outing in a scenic corner of southern Arizona.