
A long day hike or 2-day backpacking trip, the 9-mile lasso-loop at Upper Muley Twist Canyon in Capitol Reef National Park has it all: colorful, striated cliffs; sinuous slots; a half-dozen impressive arches; and spectacular views atop a beautiful section of the jagged Waterpocket Fold. Here the red-orange Wingate sandstone has eroded into a peculiar playground of natural arches, muffin-shaped knobs, slickrock slopes, and slanted spires that give the landscape an extraterrestrial feel. While the first 4.6 miles of the hike negotiate the canyon bottom, the 2.7-mile rim route, which traverses several Navajo sandstone fins, offers sweeping panoramas that rival—if not surpass—the beauty of nearby Strike Valley Overlook.
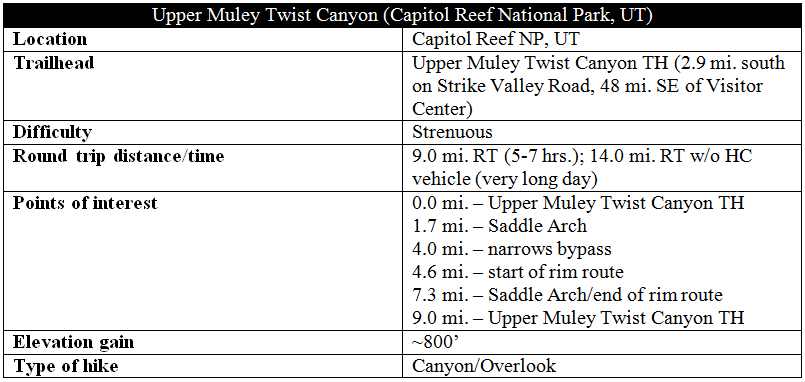
The hike
While Upper Muley Twist’s remoteness in Capitol Reef’s southern district offers solitude, it also comes with a price: the canyon is notoriously difficult to access. It is nearly 1 ½ hours from the Capitol Reef Visitor Center to the start of the Strike Valley access road, a corollary of the well-graded but unpaved Burr Trail Road. From here, it is a tedious slog down the rocky track—accessible only to high-clearance vehicles (4WD also advised)—for 2.9 miles to the Strike Valley parking area, the trailhead for journeys into Upper Muley Twist Canyon. (Note: 2WD cars with moderate clearance can drive as far as a pull-off with a trail register 0.4 mile down the Strike Valley Road. From here, it is a 2.5-mile walk along the jeep track to the Upper Muley Trailhead.)
Whether driving or walking, it is worth making a number of stops along the Strike Valley Road before reaching the official trailhead. First, within ½ mile of the Burr Trail, enjoy splendid views of Peekaboo Arch, a triangle-shaped cavity in the cream-colored Navajo sandstone and the first of nearly a dozen arches easily spotted in the area.
Roughly 2-2 ½ miles north on the Strike Valley Road, two double arches are visible on the left. The first twin span is most often referred to as Trinity Arch. (Note: Trinity Arch is best viewed from just off the road; it would be extraordinarily difficult—and dangerous—to friction climb to the base of the double arch.)

A couple minutes’ drive down the road, look for another set of arches high up in the Wingate to the west: this double span is best known as Cheerios Double Arch. From here it is a short drive/walk to the Strike Valley parking area and Upper Muley Twist Canyon Trailhead. (Note: The road’s toughest obstacles—a handful of protruding rocks—come in this final stretch.)

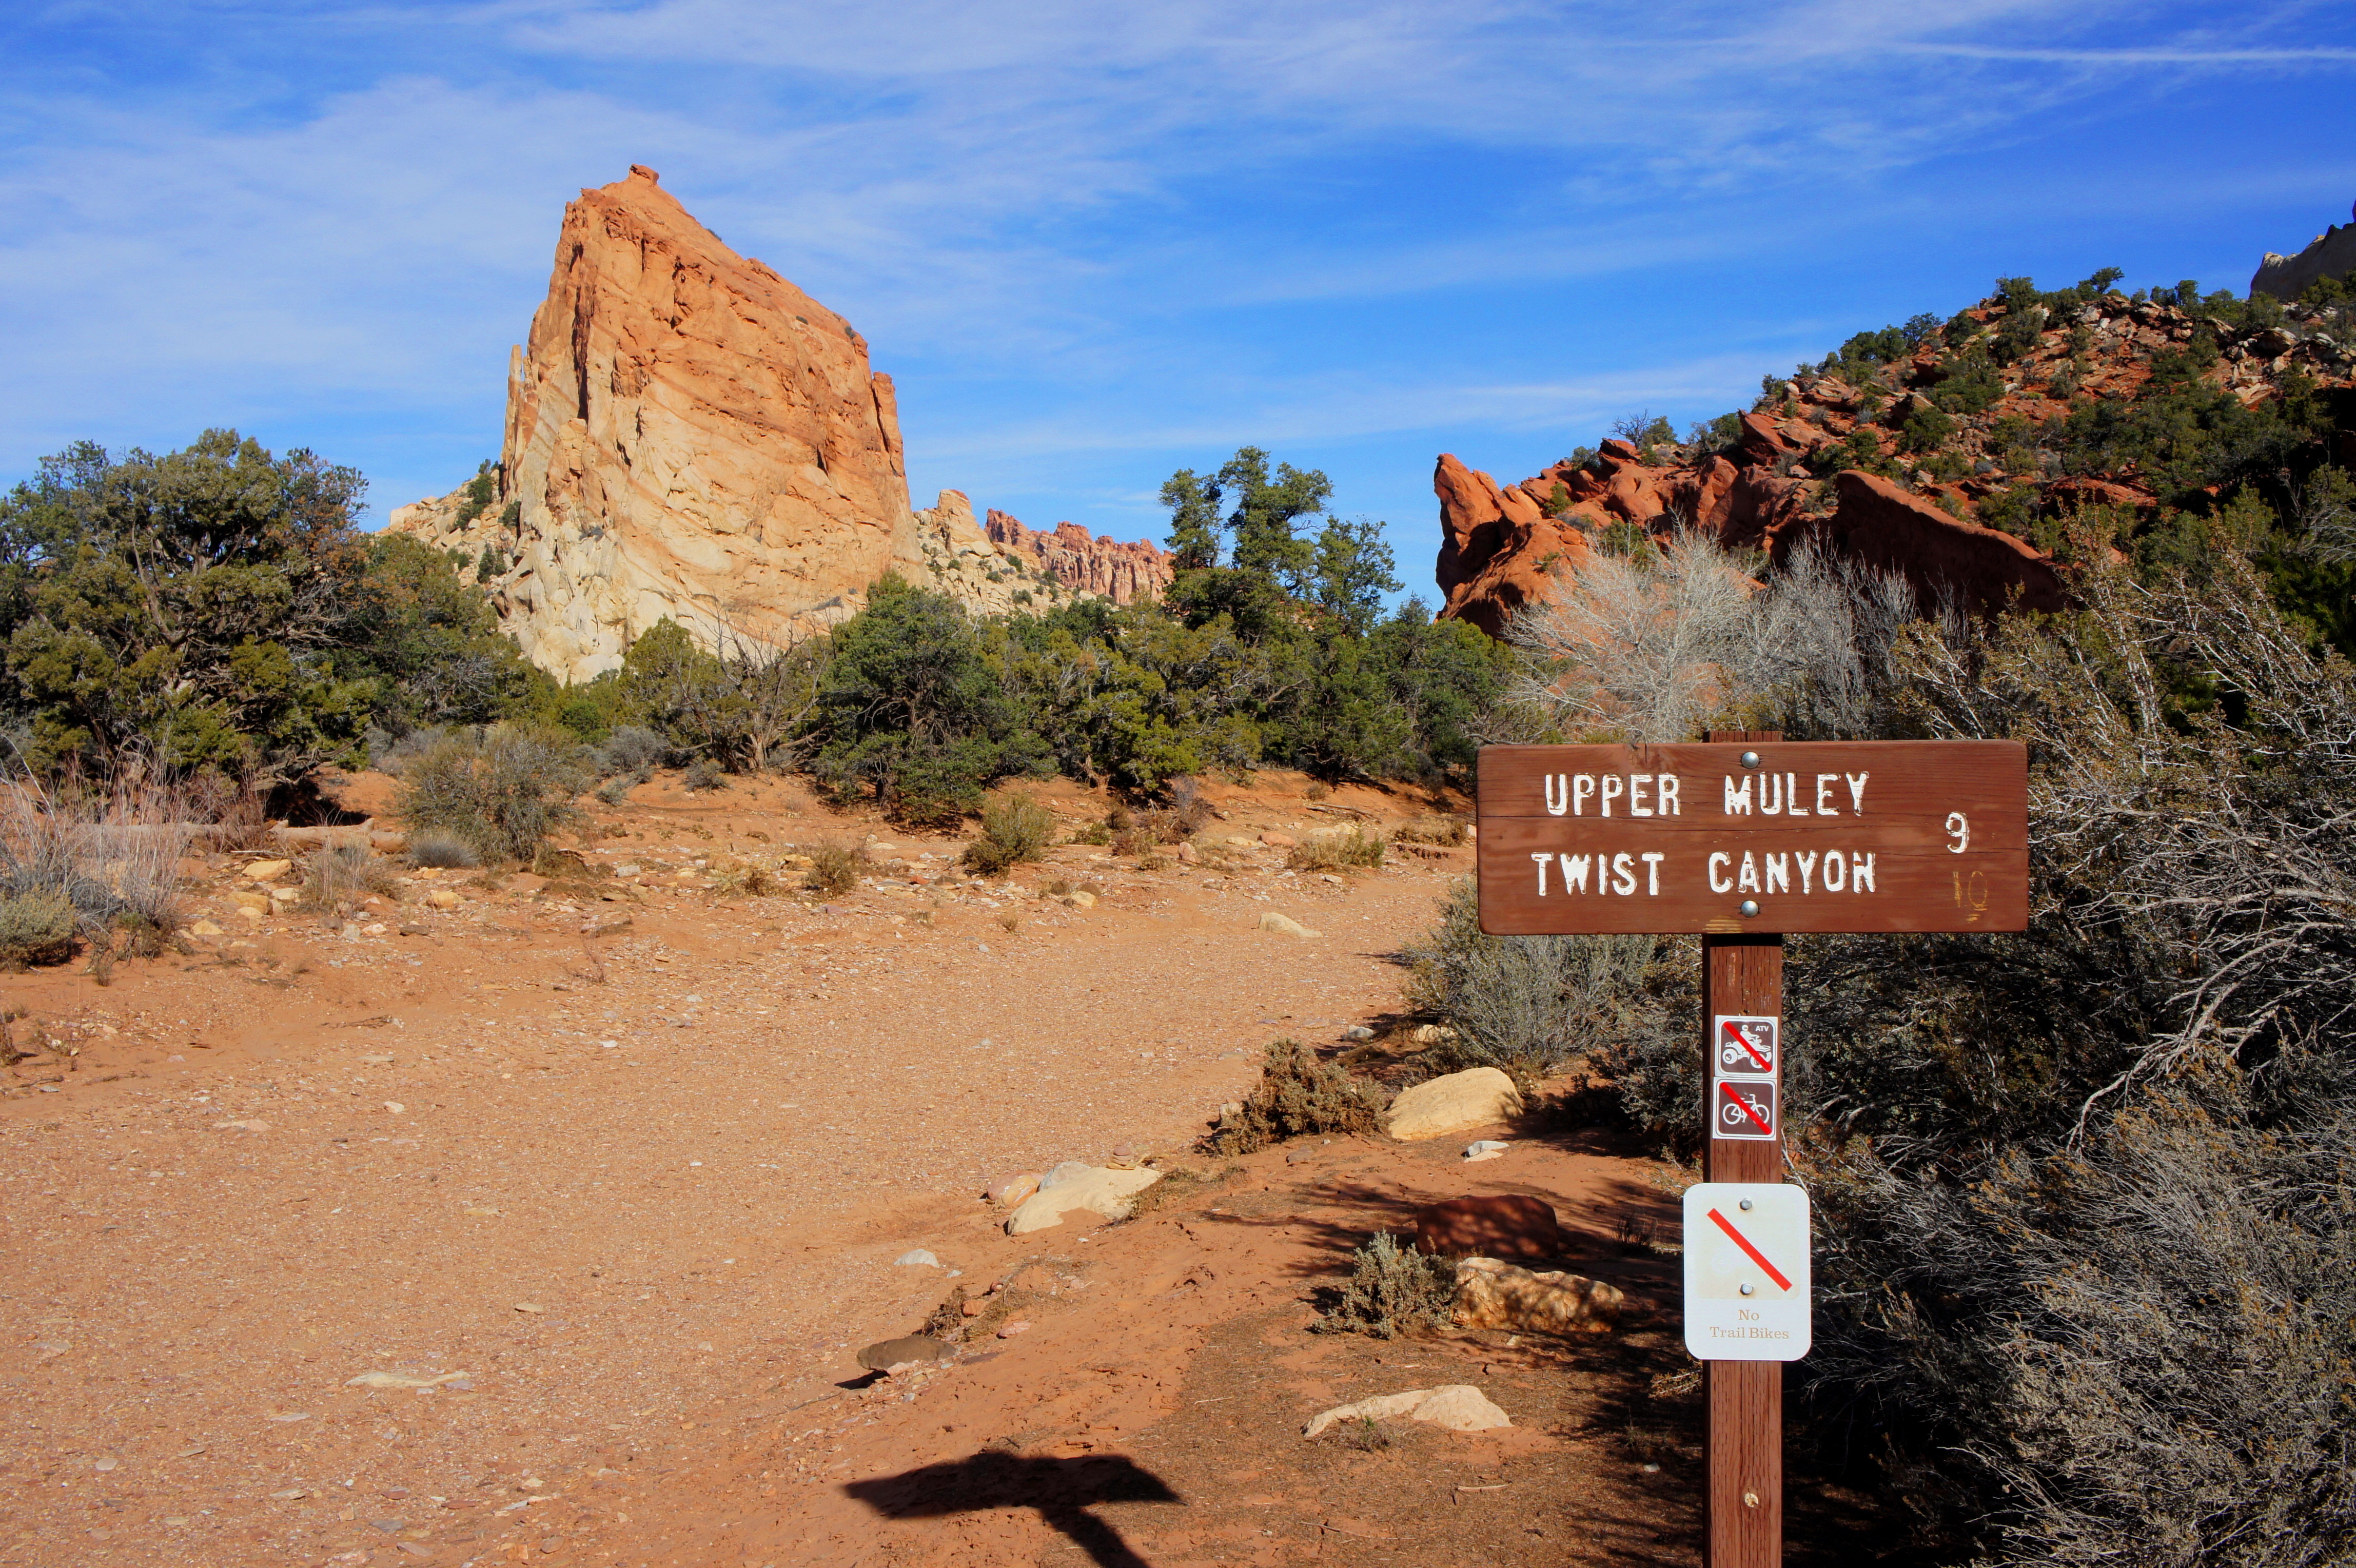
Two hikes begin from the trailhead. A short trail takes off to the east bound for Strike Valley Overlook, one of the most remarkable viewpoints in Capitol Reef (see my recent route description). To the north, a small wooden sign reads “UPPER MULEY TWIST CANYON 9”—this marks the start of the 9-mile Upper Muley Twist loop.
Canyon route
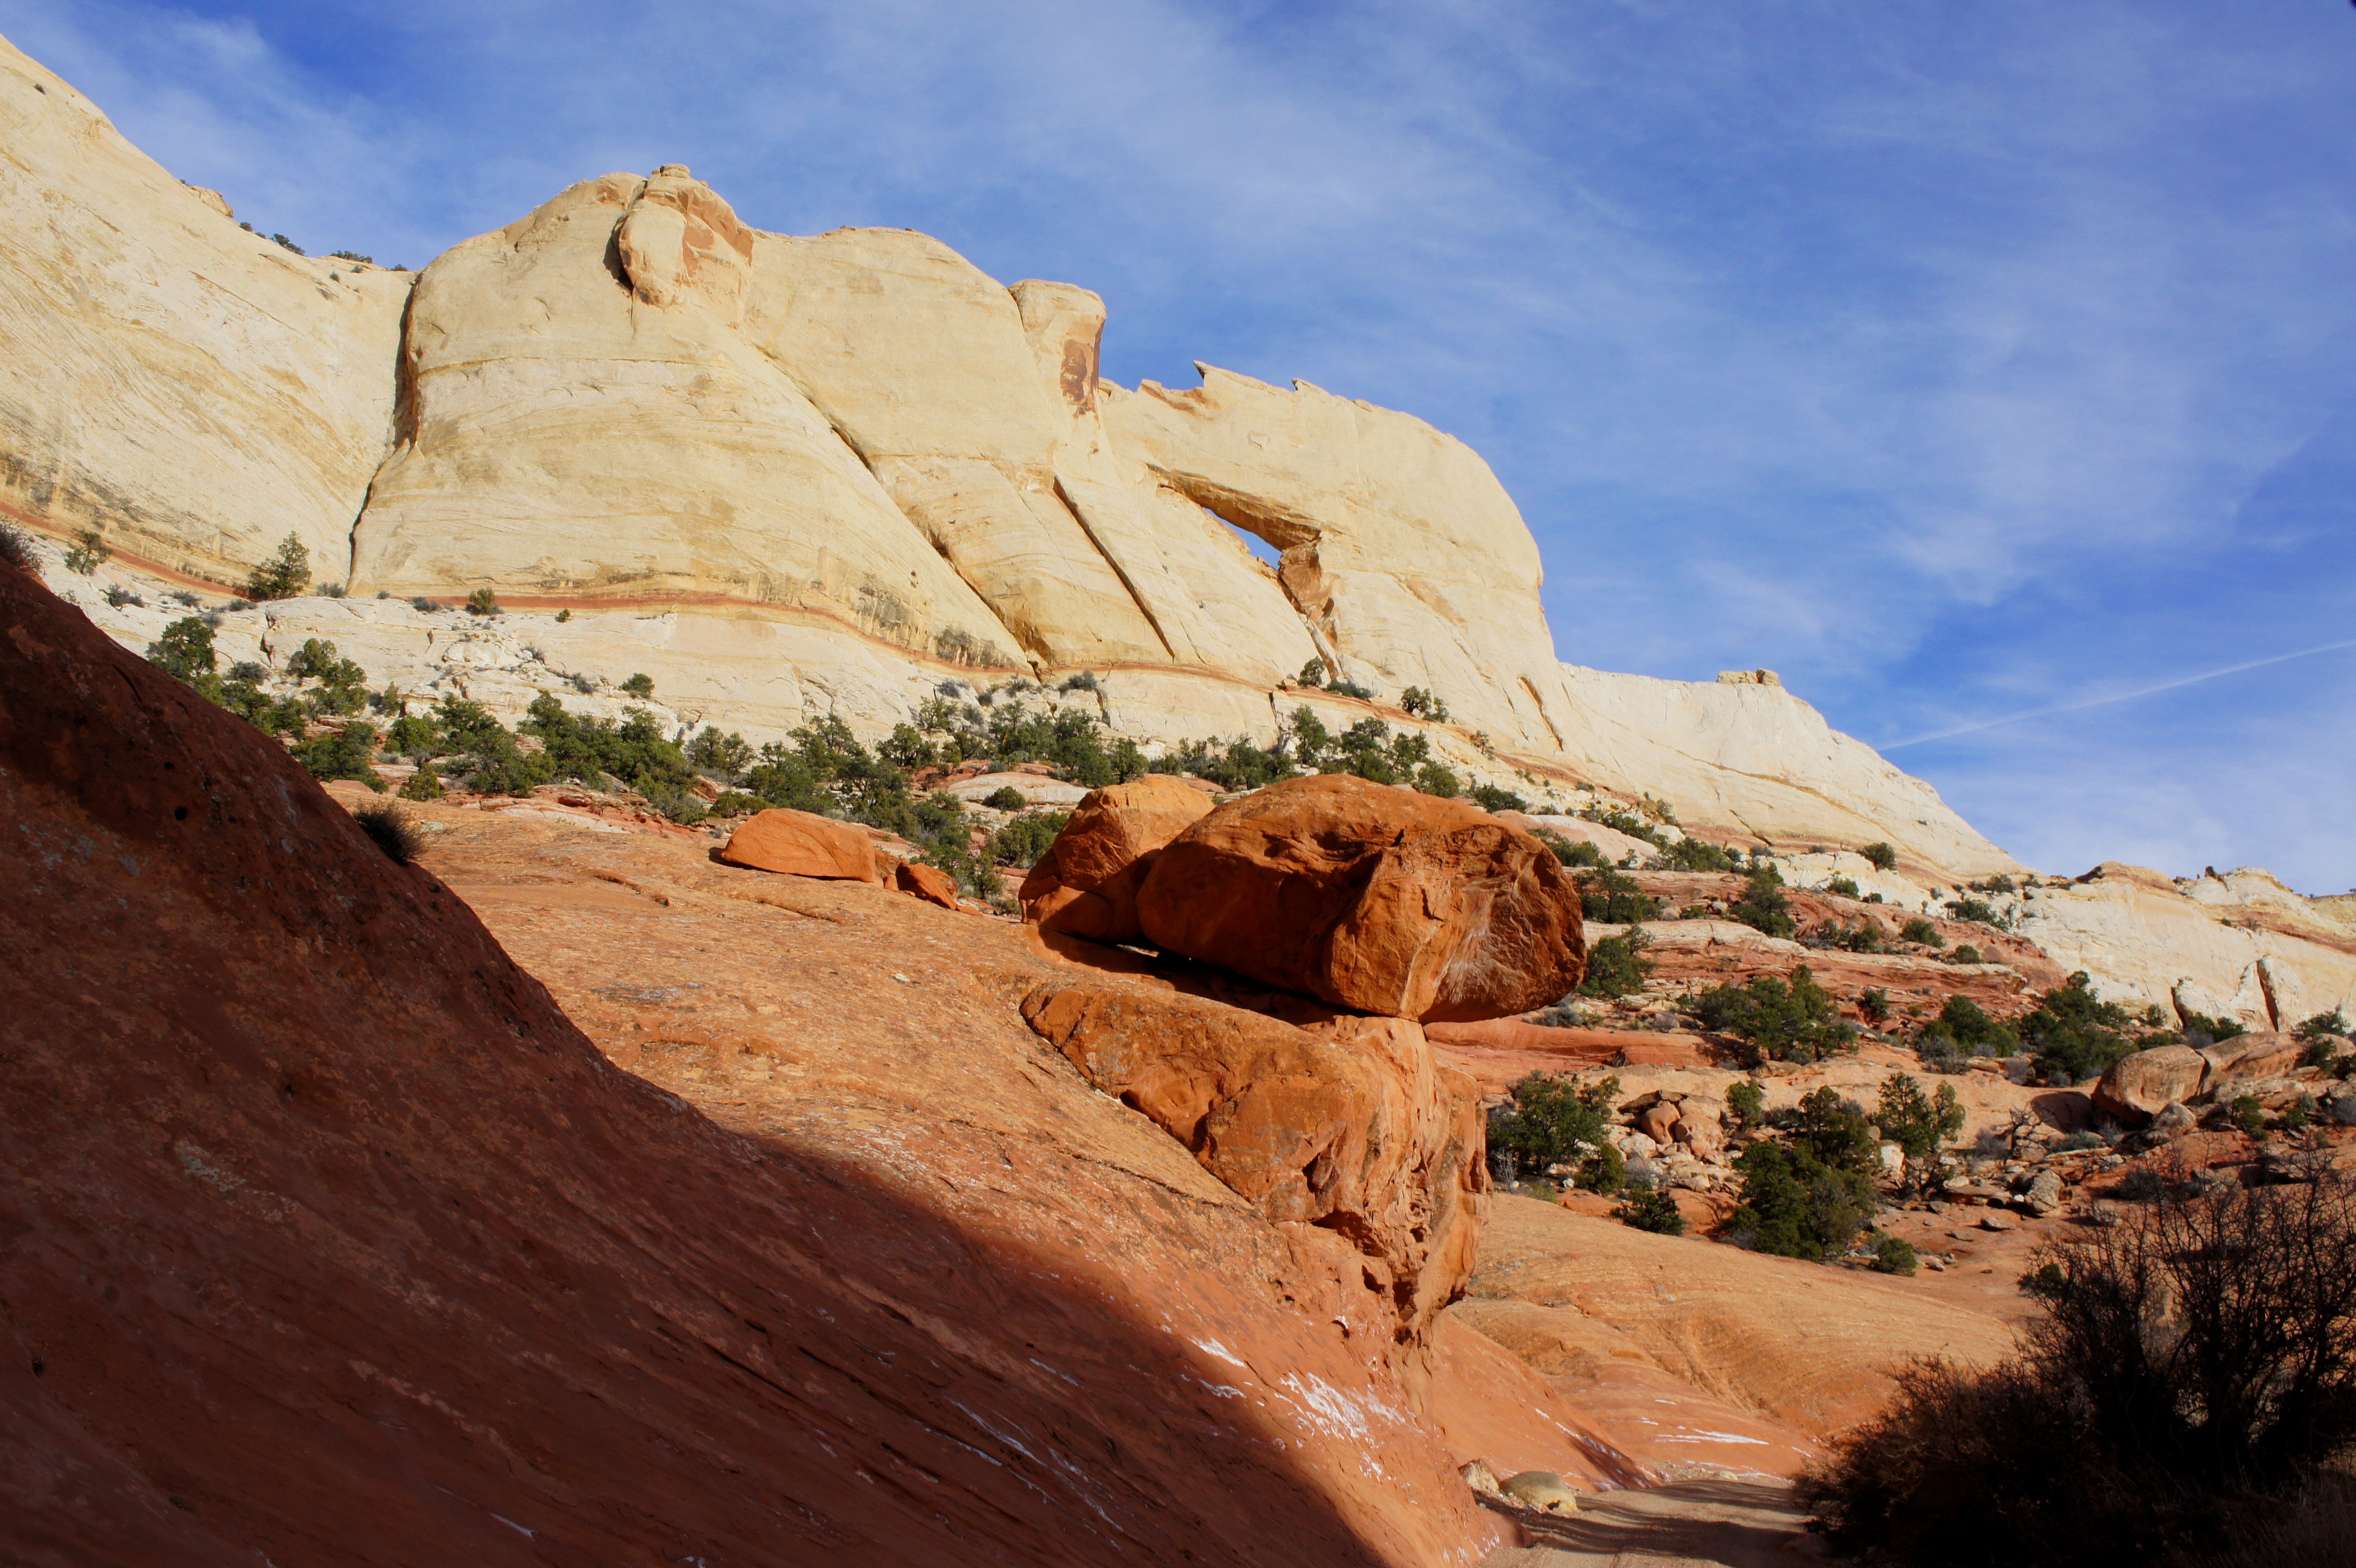
The first four miles of the hike involve simply trekking through the sand-strewn wash bottom. For most of the first 1.7 miles to Saddle Arch, hikers can be excused for noting that this section of Upper Muley Twist Canyon feels little like a canyon at all. While the Navajo sandstone slopes to the east frequently reach vertical, the west flank remains relatively open—interrupted only by occasional fins and pinnacles composed of both Wingate and Navajo. Around the 1.5-mile mark, the canyon narrows and lofty, gray-speckled walls fill in the space to the west. It is around this point that Muley Arch—a blocky, varnished span—appears on the left. (Unlike some of the other arches, it is possible to scramble to the base of this arch.)
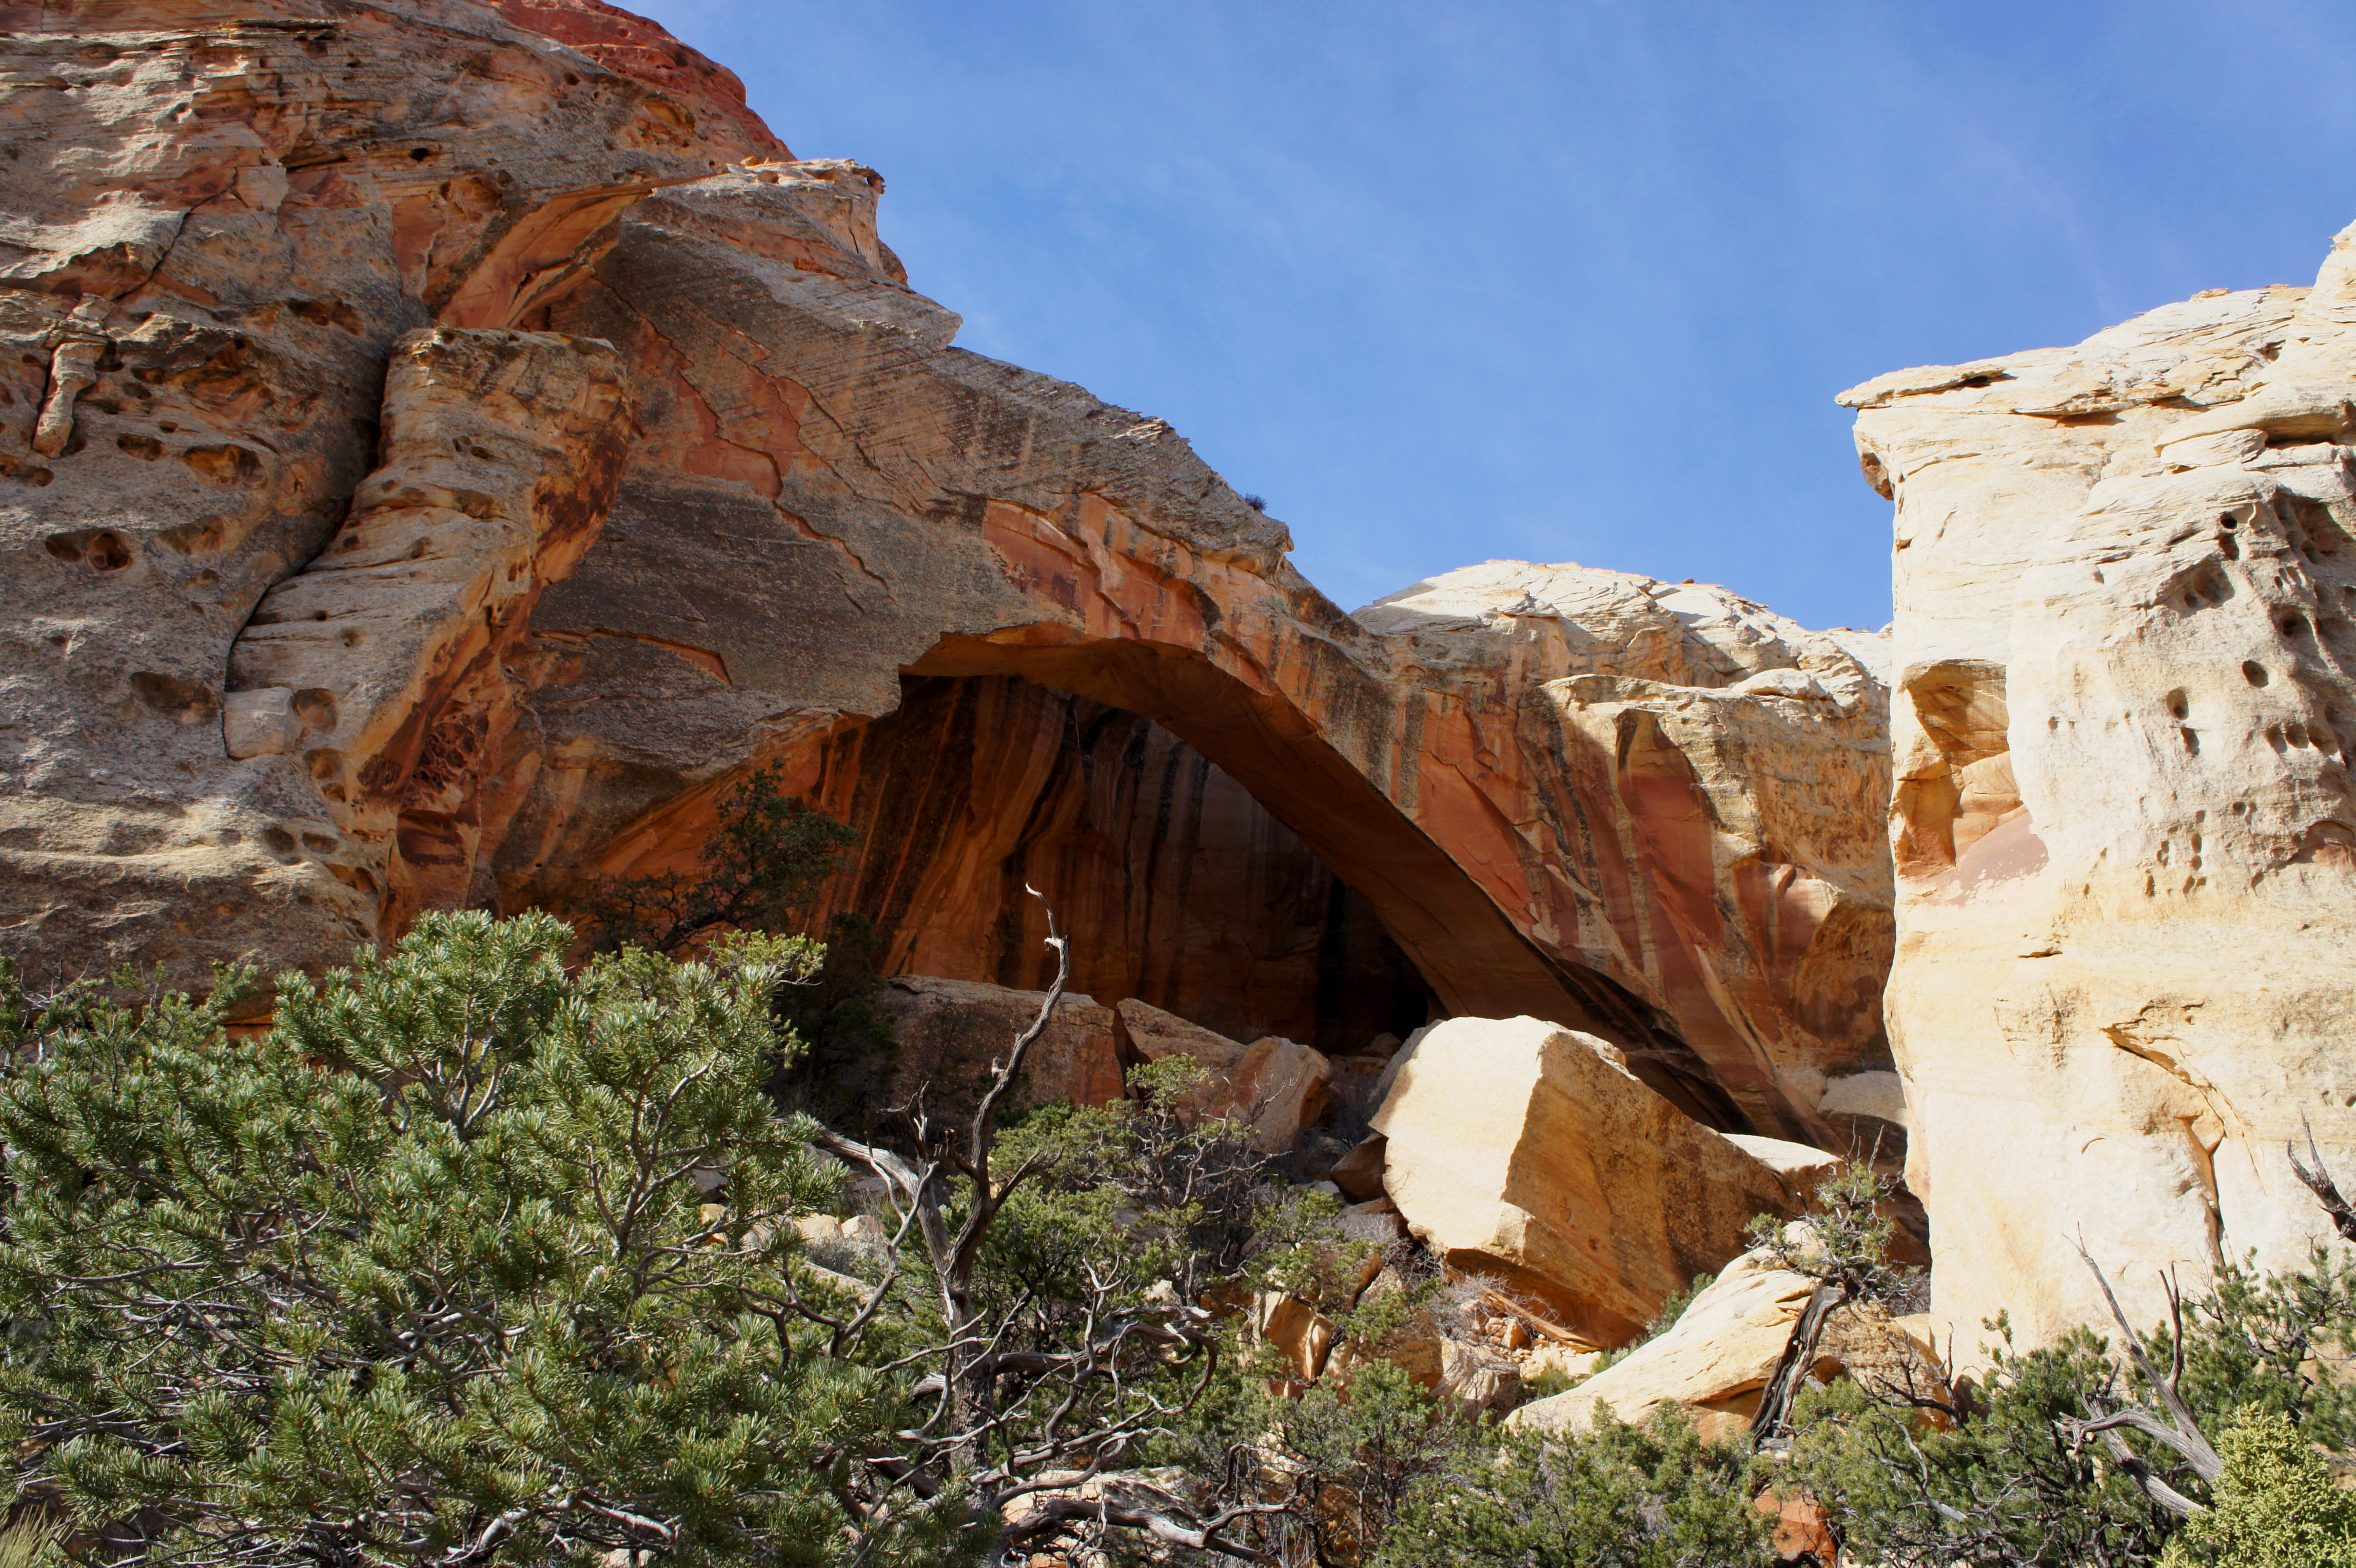
Beyond Muley Arch, yellow-tinted Wingate walls give way to a flame orange hue. The canyon on the left is less bounded by cliffs than by sandstone slopes, frequented pockmarked by honeycomb weathering. On a topographical map, it is possible to segment the western landscape into several triangular-shaped sections, with steep, sheer drops on the west side (invisible from view) and more gradual, wildly undulated slopes facing Upper Muley Canyon to the east. The sections are connected by ephemeral washes or low passes—many of which are passable on foot.

Muley Arch is found just before the first of four such breaks. The next attraction—Saddle Arch—is located just beyond. Arguably the most impressive of all the arches encountered on the hike, Saddle is hard to miss. The slickrock slope below is accented by diagonal strips, alternating between a light orange and a reddish-pink. (Note: Climbing the base of Saddle Arch would be a perilous endeavor to all but the best climbers.)

Across from Saddle Arch is a faded wooden sign—easy to miss—marking the southern end of the rim route and start of the 5.6-mile loop portion of the hike. Here you face a choice: continue up-canyon and return via the rim route, or ascend the rim route and then trek down the canyon. The rim route will be steep and relatively exposed regardless of direction, but the climbs are generally shorter and the slopes easier when performing a clockwise loop—up the canyon, then down the rim route.
Up-canyon from Saddle Arch, the wash has formed winding narrows, though they are not particularly deep. (Note: We encountered several muddy pools here on our hike in February 2015.) The canyon walls periodically dip in and out of a ledge- and shelf-forming rock layer called the Kayenta formation, while the canyon bottom flirts with the multicolored clay of the Chinle formation. As a result, the rock- and mud-strewn wash can be mucky and even downright unpleasant in places.
Near the end of Wingate “triangle” #2 to the west, a conspicuous span peculiarly named Shy Arch comes into view. (Note: This arch is located perhaps 200 feet up a sandstone slide, again putting it out of reach to hikers.)

Around 5-10 minutes’ walk reveals another doorway in the rock, this one known alternatively as Dome Arch or Rimhandle Arch. The Wingate here is dotted with striated crags and bumps resembling pimples or—when honeycombed—giant beehives.

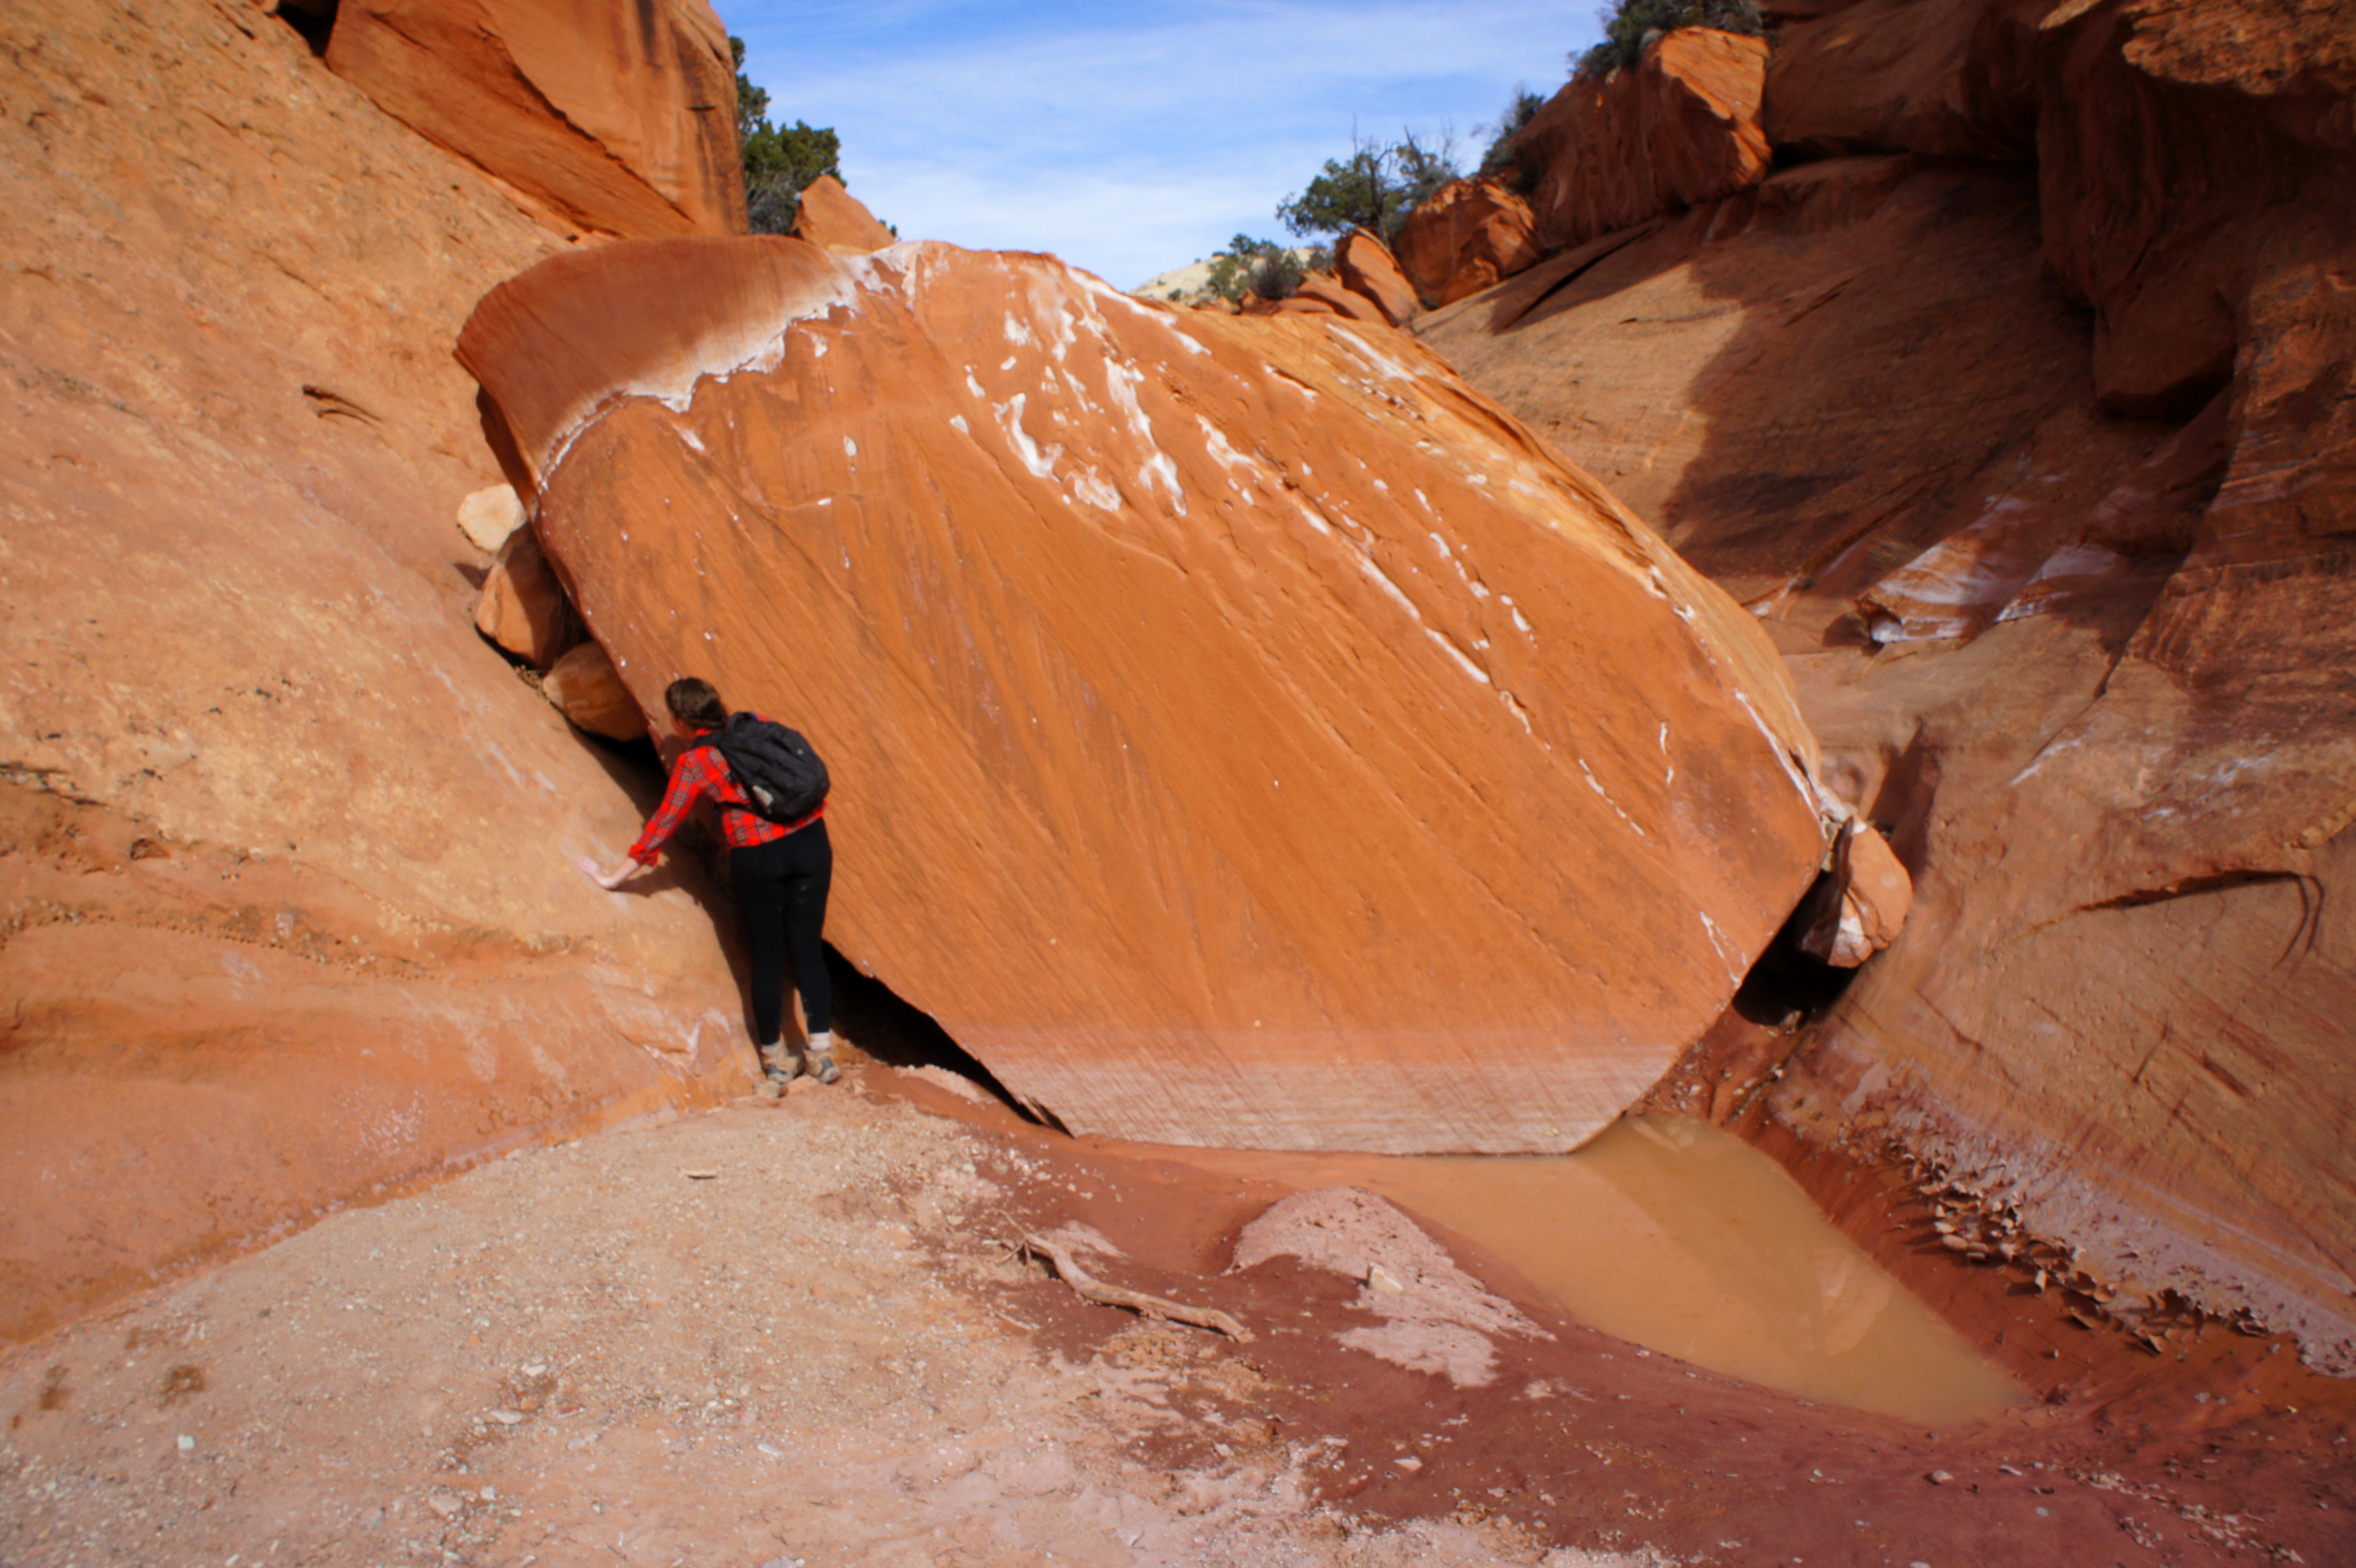
Beyond Dome Arch, hikers will encounter perhaps the most difficult obstacle of the hike: a mammoth-sized boulder often preceded by a muddy pool. To avoid getting wet requires wedging up a sideways crack between the boulder and the canyon wall on the left. Having a hiking partner to assist with your climb is a big plus.
The next attraction of note is Cap Arch, effectively an alcove with a thin slit at the top where the rock has gradually dissolved. The perk of this arch is that it is easily accessible, located just steps up a side canyon that separates Wingate triangles #3 and #4. This is a nice, shady place to stop for a bite to eat.

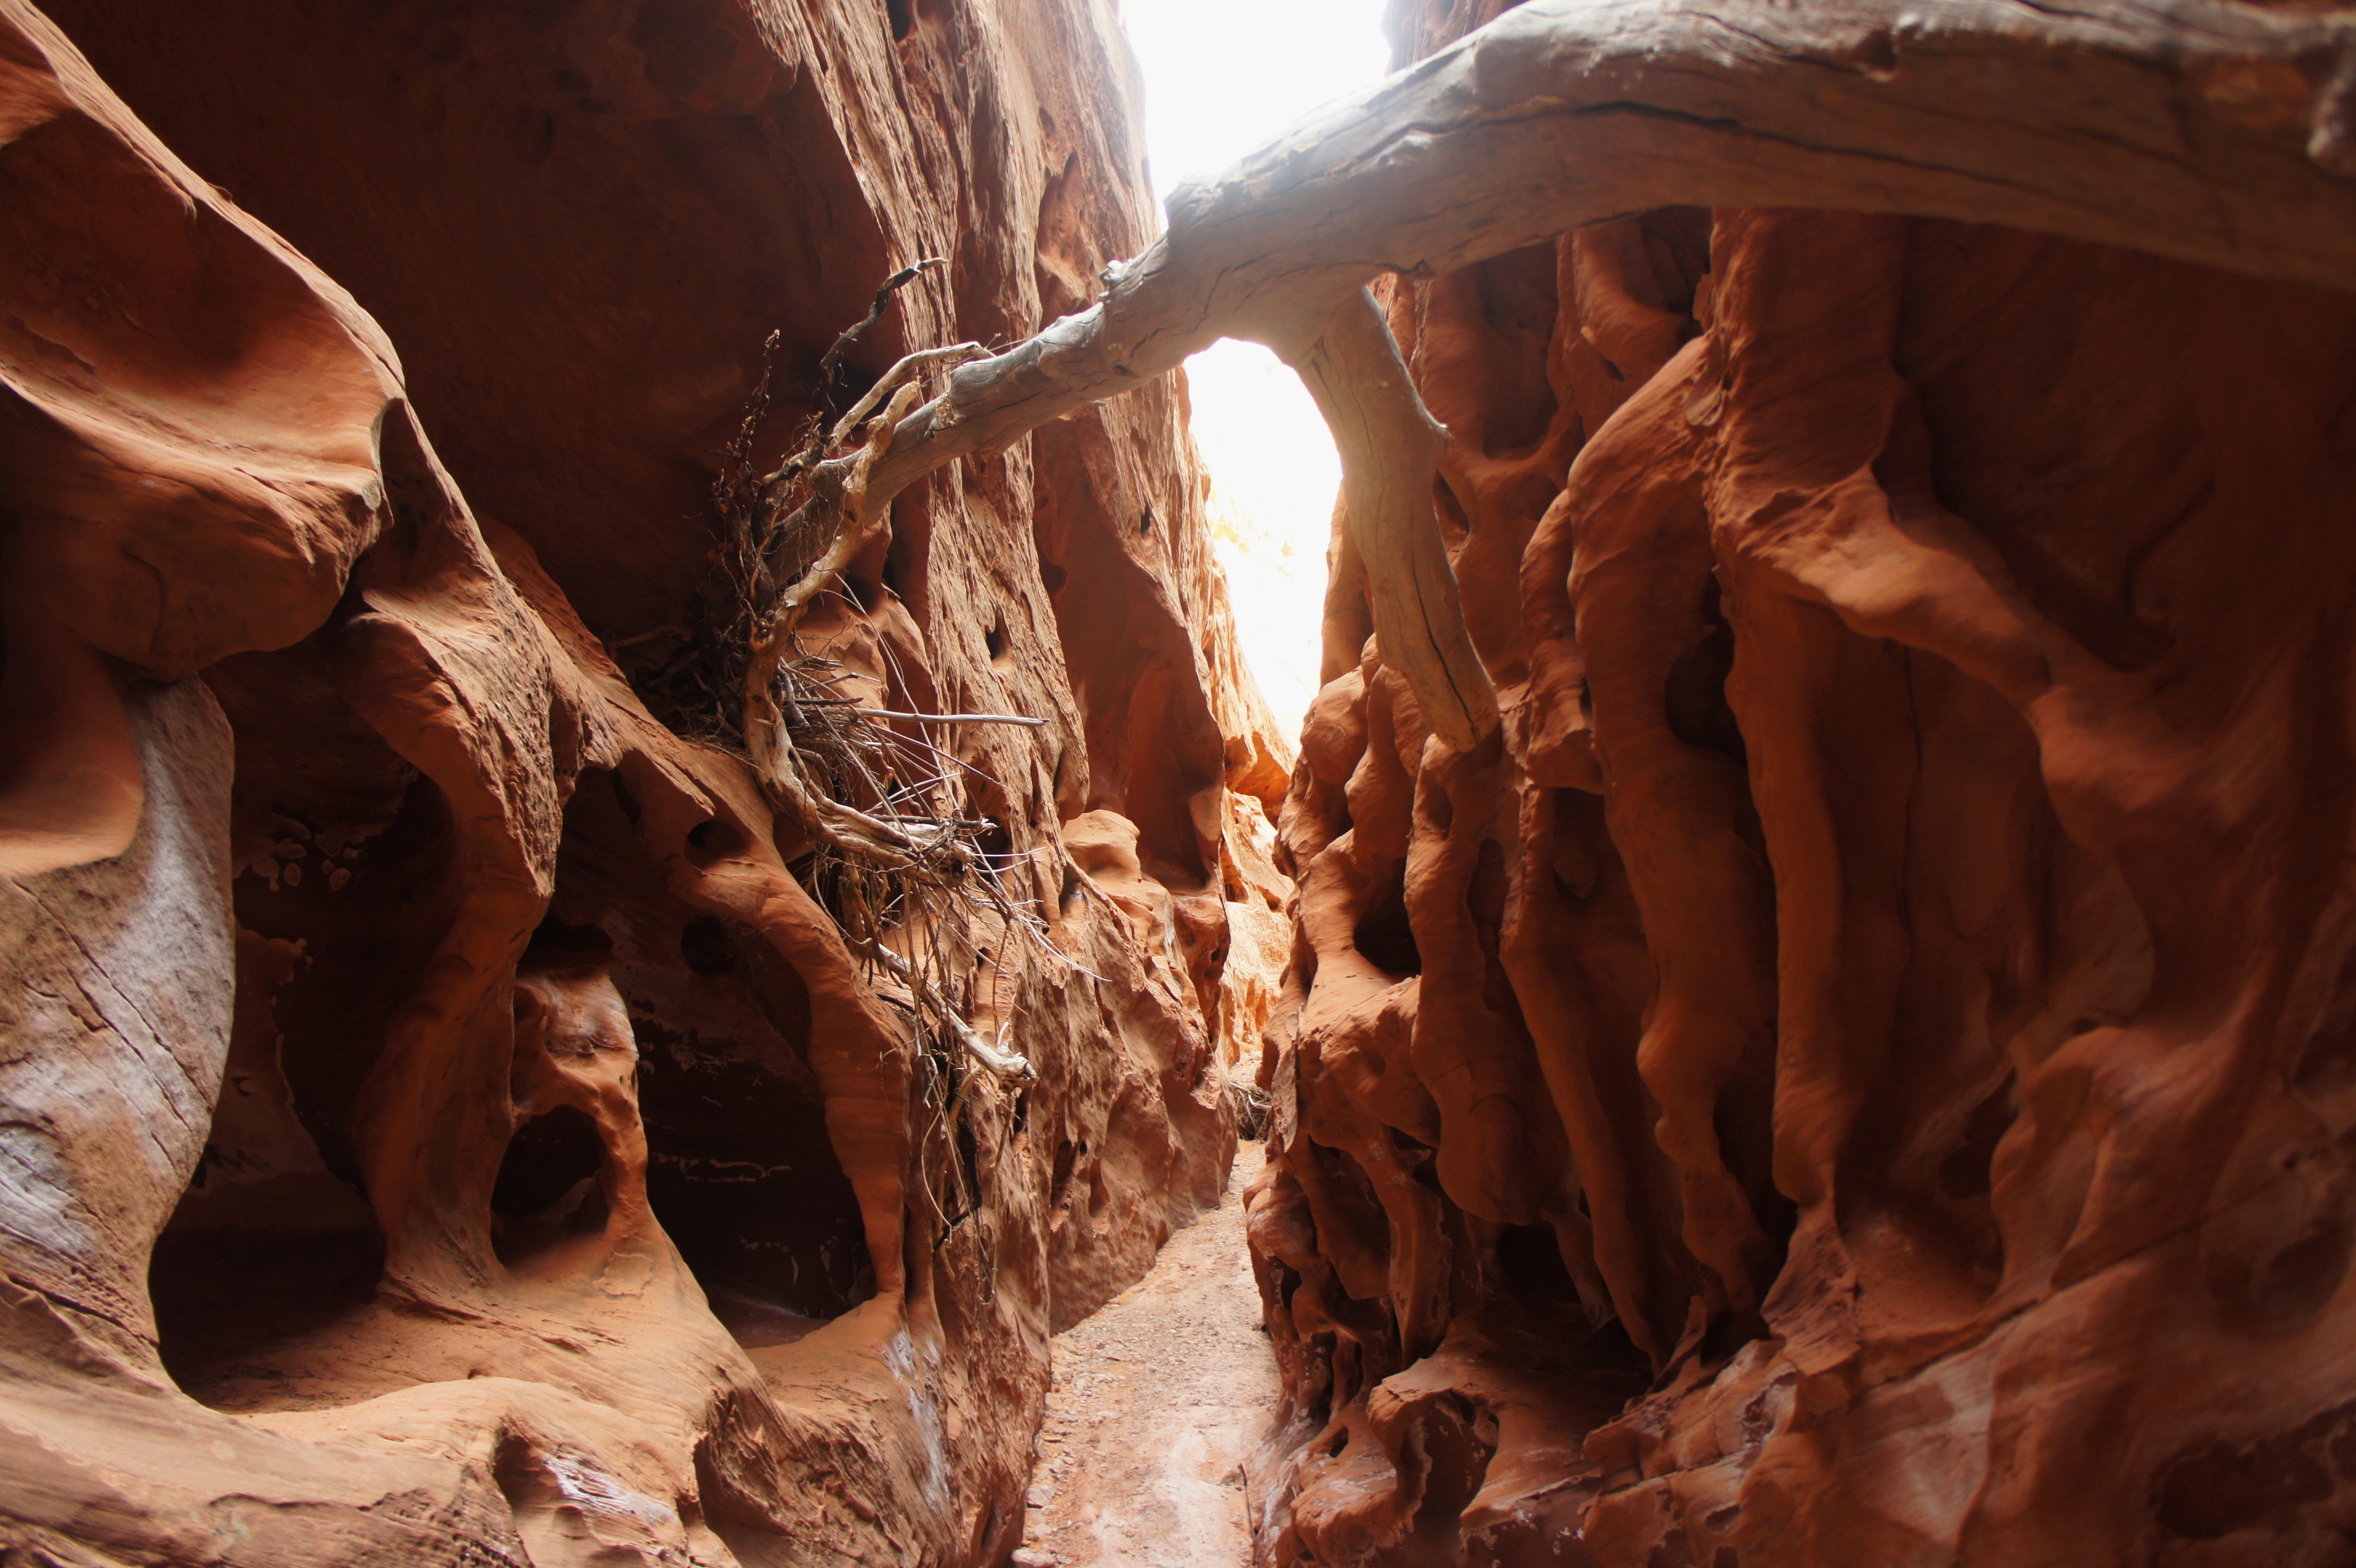
It is perhaps a five-minute walk from here to the beginning of Upper Muley Twist’s impressive slot section. Unfortunately, the narrows eventually dead-end at an impassable pouroff, requiring hikers to return to the start, where a steep bypass ascends a shelf to the east. (A few minutes’ walk up the narrows—beyond a 6-foot chockstone—many hikers will encounter a 10-foot pouroff. It is possible here to friction climb to the top of a slope on the right, but perhaps not recommended. According to Rick Stinchfield’s Capitol Reef National Park: The Complete Hiking and Touring Guide, the narrows continue beyond this point for “quite some distance.”)

Returning to the bypass, a cairned route guides hikers sharply up and over a series of slickrock humps along the canyon’s eastern flank. Though the trail remains a good distance from the sheer drop-off into the narrows, it can feel rather exposed to many.

One of the hike’s highlights—a series of rocky bumps resembling a diagonal rack of toadstools or muffin tops—is visible across the canyon from the bypass route. Shortly beyond, the canyon below briefly widens, and a significant dry wash tributary enters from the west. This does not last, as the main wash upstream is again swallowed up by an extremely narrow slot. About 1/3 mile into the bypass, the route drops back into the wash bottom, meeting it just above the top of the slot.

Here the landscape changes rather dramatically. Vegetation increases, and the wavy hills of Wingate slickrock disappear into the rear view mirror. The Wingate is replaced by older rock layers—including the Triassic Chinle and even Moenkopi formation, the latter on full display among a collection of furrowed, crumbly, carmine-colored hoodoos to the west. A difficult pour-off in the Moenkopi about 200 yards up-canyon from the slot is easily bypassed on the left.
Rim route
Be on the lookout here for a weathered wooden placard pointing right. It is marked “RIM ROUTE.” Though the canyon continues onwards for miles to the north, it’s time to begin turning east and eventually south, by way of a spectacular 2.7-mile traverse along the spine of the Waterpocket Fold.
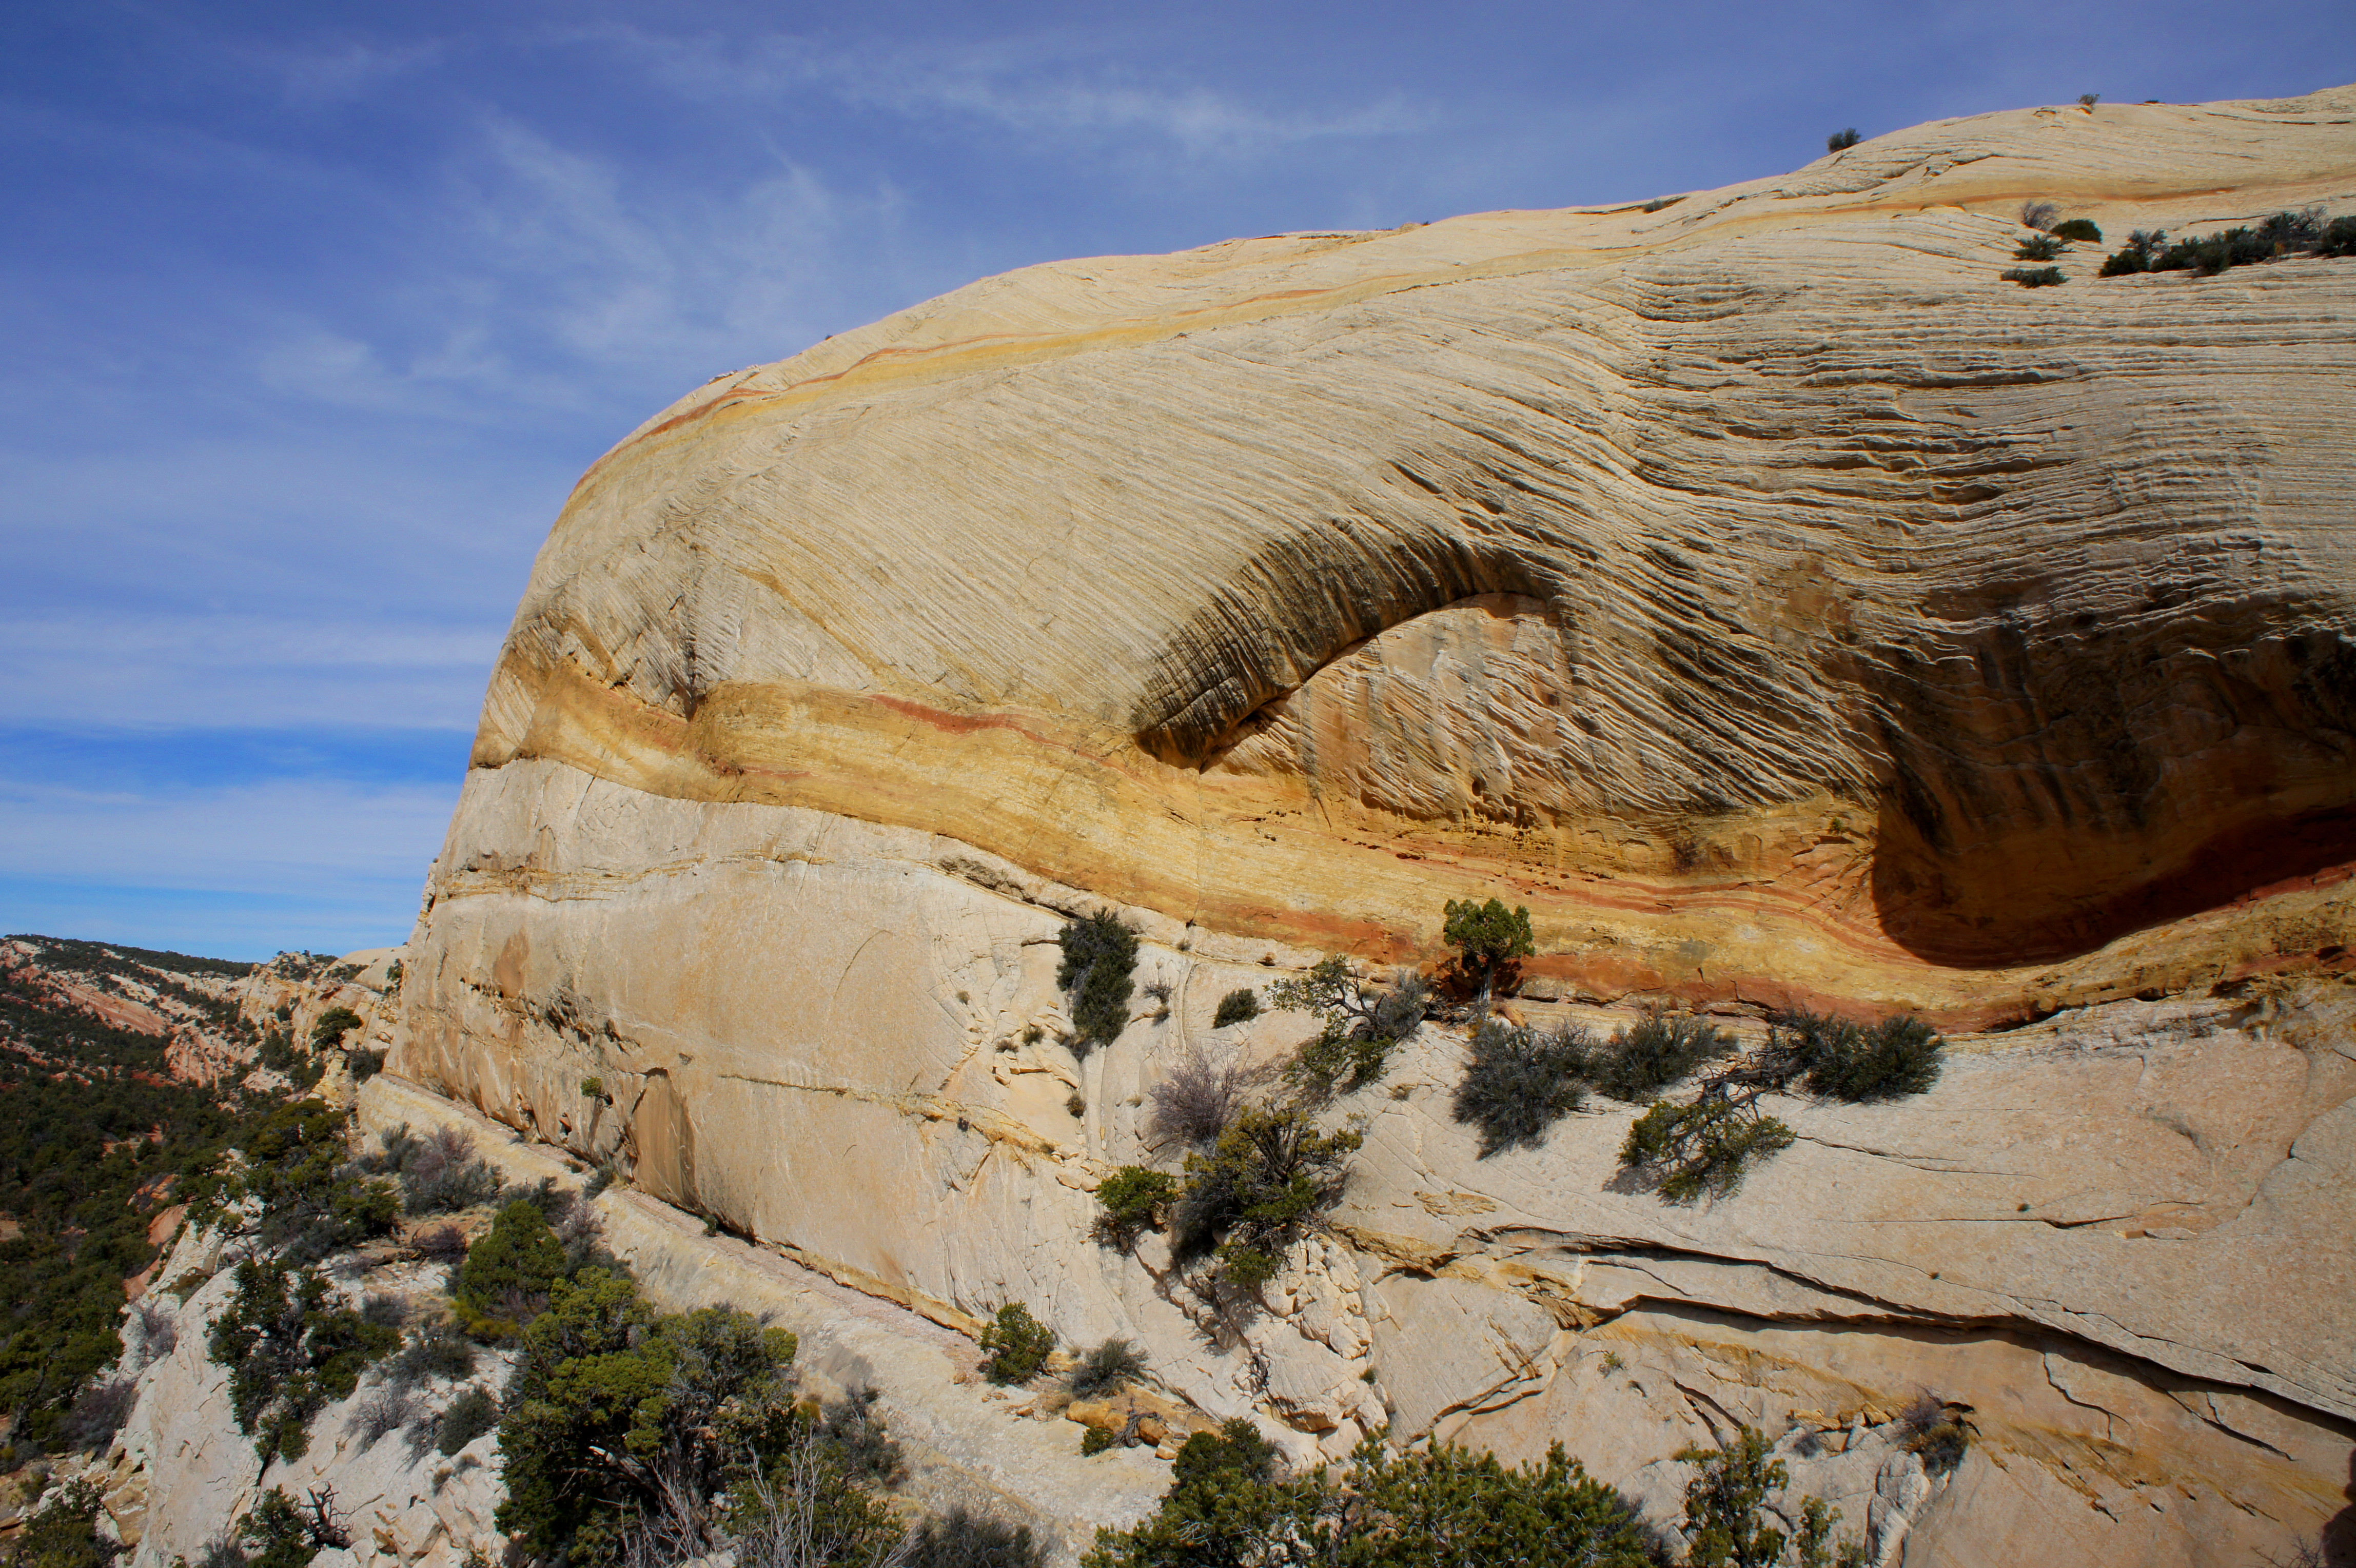
The predominant rock layer here is the whitish Navajo sandstone, occasionally streaked with strips of pink and gold. Partway up the first steep climb, a look back north reveals a seemingly endless line of Navajo walls.
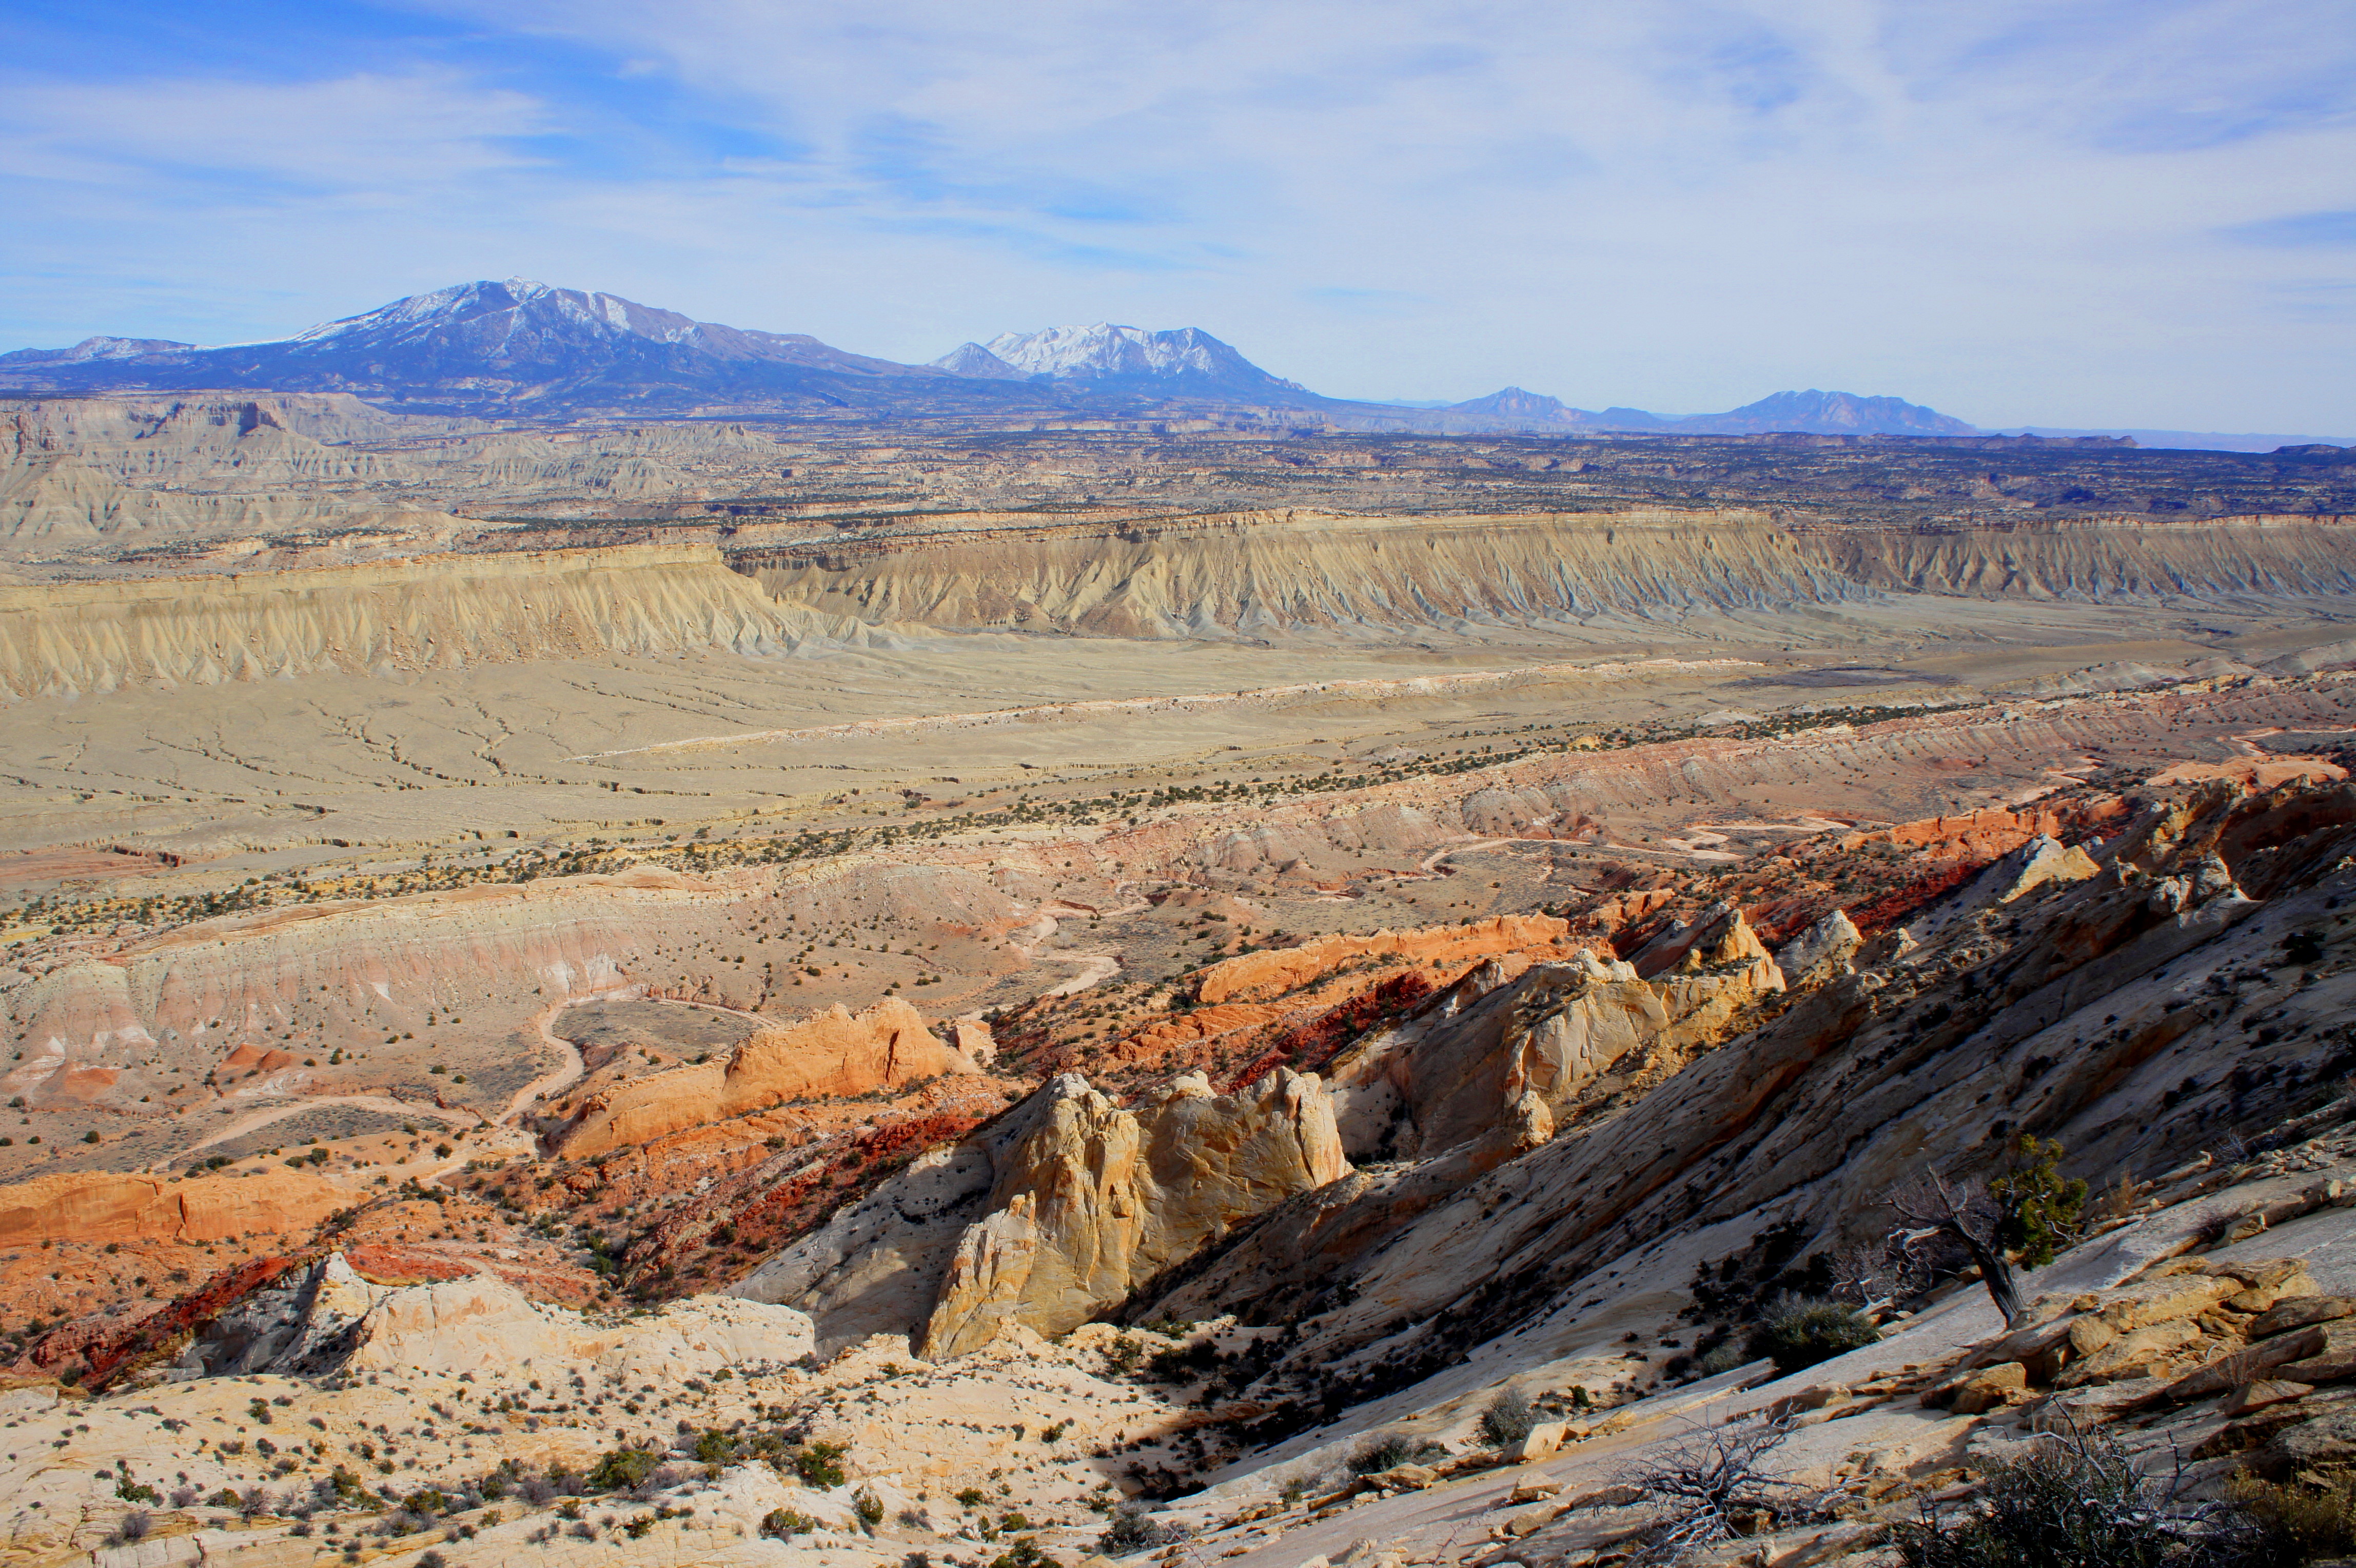
The opposite, east-facing side of the sandstone fins remains concealed from view until suddenly, upon exiting a minor drainage and cresting the mighty ridge, the stunning panorama reveals itself: a wide valley, bounded on the west by the multicolored Fold and to the east by the wavy badlands of the Mancos shale, a sedimentary layer dating to the Cretaceous period. The Henry Mountains—the last range in the contiguous U.S. to be mapped—loom tall over flat-topped Swap and Tarantula Mesas.

Between the mesas and the Fold, more than a half dozen sedimentary layers are represented, including deep red “chevrons” of the Carmel formation, orange globs of Entrada sandstone, and a series of ridgelines composed of the Morrison formation, Dakota sandstone, and multiple members of the Mancos shale. In contrast to the twisted and chaotic arrangement of Wingate sandstone to the west, the strata of Strike Valley appear orderly and neatly arranged in clean, horizontal lines.
The terrain atop the Fold is markedly different from that of the rest of the hike. Periodic cairns offer the only indication of an established trail across the ubiquitous slickrock. The windswept rim is surprisingly flat in most places—facilitating a relatively easy stroll that allows hikers to soak in the views. In lieu of looking up at Upper Muley’s many arches, you are now invited to peer down into the messy Wingate to spot the spans in turn.

At a point roughly the same latitude as Cap Arch, the route approaches an exposed saddle between two long fins. A precipitous drop-off on the right forces hikers to the left, where cairns blaze a way down to the saddle and up the side of an east-facing slope to the top of the next ridgeline. The ascent requires a steep friction climb—though easy to secure sure footing, the slickrock grade can be somewhat harrowing for the faint-of-heart.


As the route continues south, it descends to two more low saddles, both relatively exposed but not as intense and demanding as the first. Vistas to the east improve further as more and more rosy Carmel fins emerge in a line off to the north.


Past the third saddle, the trail departs the slickrock in favor of sandy pinyon-juniper highlands. Roughly level with Saddle Arch to the west, the trail begins a steep and winding descent back to the canyon floor. Following a couple rocky sections that require caution, the rim route drops down to the wash bottom directly across from the arch. The loop portion is now complete.
From here, retrace your steps 1.7 miles back to the Strike Valley parking area. For those unable to drive the rocky track, it is a further 2.5 miles back to your vehicle.
Because of the remoteness, considerable elevation changes, and plethora of interesting areas to explore, visitors might consider completing Upper Muley Twist Canyon as a 2-day backpack.
Extra credit
With time and energy to spare, consider visiting Strike Valley Overlook, which is easily reached from the Upper Muley Twist Trailhead. It is a 0.8-mile round-trip hike to the crest of a low break in the Navajo slickrock—beyond which the extraordinary colors of the Strike Valley reemerge. Particularly rewarding are the views of the s-shaped bend in the Fold to the south. See here for my recent route description for Strike Valley Overlook.

Pingback: Lower Muley Twist Canyon – Upper Section (Capitol Reef National Park, UT) | Live and Let Hike
Well, we completed Upper Muley Twist yesterday!! We had a perfect day with a sunny sky, a few clouds, and a breeze with temps in upper 60’s. There was only one other couple, that arrived when we did, the whole day. They did the hike counterclockwise which I think is a mistake. The first part was our favorite and I’d rather do it while fresh. We were gone before they returned but we did see them at the top. Anyway, I had all your mileage and arches on a posted note. It was most definitely helpful and appreciated. This was the first hike where my ankles were tired. Lots of side ways hiking on the slickrock and so many steep climbs up!! The 1.7 miles out the flat easy wash was a nice way to recover. It was a wonderful hike but you must be in shape and not afraid of heights!
Great! Definitely one of the best – I am thinking of putting together a “Top 10” list for Capitol Reef. What would you say are your favorites?
Probably my favorite hike was Sheets Gulch that we did two years ago. Also, Spring Canyon is fantastic for the amazing rocks. Every turn brings new formations. I would also include Upper Muley Twist, Cohab Canyon – Frying Pan – Cassidy Arch, and Golden Dome. There are still so many hikes we need to get to but the weather really hurt us. We were here for 18 days and only got a week of decent weather. Oh, well, next year!
Pingback: Cathedral Valley Loop Drive (Capitol Reef National Park, UT) | Live and Let Hike
Pingback: Top 10 Hikes in Capitol Reef National Park’s “Backcountry” | Live and Let Hike
Pingback: Patreon April-May Featured Hikes – Zone 1 (Pacific Northwest) & Zone 2 (Northern Southwest) – Anne's Travels